Select Menu

Slider

Windows

Apple | Mac

Linux

Mobile

Hardware

Tutorial

Android

What to expect after installation

  • A single device with the ability to switch between fully functional Android and Ubuntu images
  • On Android: an Ubuntu Installer app to install Ubuntu, as well as to boot into Ubuntu
  • On Android: the SuperUser app to grant permissions to the Ubuntu Installer app
  • On Ubuntu: an Ubuntu Dual Boot app to boot into Android
  • Ubuntu system updates are not yet supported from the Ubuntu side, but they can be done via the Android app

Requirements

To install to install dual-boot, you'll need:
  • A Nexus 4 device (other Nexus devices should in theory work but have not been tested at the time)
  • Android 4.2 or higher running on the device, either stock firmware or based on CyanogenMod or AOSP. Note that Android 4.4 requires additional steps to get phone calls working on the Ubuntu side
  • 2.7GB of free storage on the device to install Ubuntu
  • ADB tools running on your desktop computer
  • The device needs its bootloader to be unlocked and USB debugging enabled. Follow steps 1 to 3 below to do this, or alternatively, if your device is already unlocked and has USB debugging enabled, you can skip to the installation process >

Step 1 - Desktop Setup

The following steps are required on your desktop system that you'll need in order to flash and communicate with the device.

Set up the Touch Developer Preview Tools PPA

The PPA has the tools and dependencies to support Precise, Quantal, Raring and Saucy. Add the Ubuntu Touch PPA by adding the following custom source list entry to your /etc/apt/sources.list file.
On your computer, press Ctrl+Alt+T to start a terminal.
sudo add-apt-repository ppa:phablet-team/tools
Then do the following:
sudo apt-get update
sudo apt-get install phablet-tools android-tools-adb android-tools-fastboot

Step 1.5 - Optional Android Backup

  • If not enabled, enable developer mode, by tapping Settings -> About phone -> Build number (x 7 times)
  • If not enabled, enable usb debugging in Settings -> Developer options -> USB debugging
  • Execute on your computer $ adb backup -apk -shared -all
This should hopefully create backup.ab with all of your apps, OS, and data. Later, after reflashing with android (or rooting / unlocking) you will be able to use $ adb restore backup.ab to restore all of your data.

Step 2 - Device unlock

If the device is already unlocked, skip to Step 3. These steps will wipe all personal data from the device.
  1. With the device powered off, power on the device by holding the Power button + volume up + volume down.
  2. The device will boot into the bootloader.
  3. Plug the device into the computer via the USB cable.
  4. On your computer, press Ctrl+Alt+T to start a terminal. Type sudo fastboot oem unlock, followed by Enter
  5. On the device screen, accept the terms of unlocking.
  6. Boot the device by pressing the power button (pointed by an arrow with Start on the screen).

Device factory reset

If you get stuck in a bootloop rebooting the tablet after unlocking the bootloader... Here's what you do:
  1. During the bootloop.. hold the power button + volume up + volume down button simultaneously to get yourself back into fastboot mode as you were previously.
  2. In fastboot mode.. use the volume keys to scroll to Recovery and the power button to select it.
  3. In Recovery (Android robot on his back with a red triangle)... tap the volume up button and the power button simultaneously which will bring you into stock recovery. Again.. Don't hold the buttons, just tap them simultaneously. Also make sure you're holding the correct volume button. Up will be the volume key on the right.
  4. Once you're in Recovery.. perform a factory reset/data wipe and then reboot your tablet... you should now be back to the Welcome Screen.

Step 3 - Initial Device Setup

Follow these initial steps on your device:
  1. If not booted, boot the device into Android
  2. Enable USB debugging on the device
    • on Ice Cream Sandwich (version 4.0) go to Settings and turn on USB Debugging (Settings > System > Developer options > USB debugging).
    • on Jelly Bean (versions 4.1 and 4.2) you need to enter Settings, About [Phone|Tablet] and tap the Build number 7 times to see the Developer Options.
    • on 4.2.2, (settings > about > tap on build number 7 times to activate the developer options menu item).
    • On either Android version you must then enable USB debugging via Settings > Developer options > USB debugging. You will also need to accept a host key on the device.
      • On the workstation-> adb kill-server; adb start-server
  3. Plug the device into the computer via the USB cable.
    • Depending on the installed Android version, a popup will show up on the device with the host key that needs to be accepted for the device to communicate with the workstation.
    • Note, 'adb devices' should not show the device as 'offline'. If it does, unplug the device, run adb under sudo on the workstation (sudo adb kill-server; sudo adb start-server), then plug the device back in.
    • In some cases, the device will continue to show offline, and the host key popup will not appear if the USB connection method is 'MTP' (default for some devices and versions of Android). Unchecking all options in the USB connection method (Settings -> Storage -> Menu -> USB computer connection -> MTP, PTP) seems to resolve this adb connection issue for some users.
  4. Save the version of the current image on the device, if on Android, to use as a reference to revert back to. The version can be found by going to Settings > About Phone > Build Number.
Newer Nexus 10s have not booted fully after developer mode was enabled. If this occurs boot into the bootloader and do "fastboot -w", then proceed to the next step.

Dual boot installation instructions

Installing the Ubuntu Installer app in Android

  1. On your computer, download the dual boot installation script into your home directory from: http://humpolec.ubuntu.com/latest/dualboot.sh
  2. Open a terminal on your computer pressing the Ctrl+Alt+T key combination
  3. Make the installation script executable by running this command:
    chmod +x dualboot.sh
  4. Ensure that your device:
    • has booted normally into the Android user interface
    • has USB debugging enabled
    • has an unlocked bootloader
  5. Connect your device via USB to your computer
  6. Install dual-boot by running one of these commands on a terminal:
    • If it's the first-time dual-boot installation and you are using stock Android or AOSP firmware without the SuperUser app, run this command:
      ./dualboot.sh FULL
    • Alternatively, to update only the Ubuntu Installer Application or if you are running non-stock Android firmware (e.g. CyanogenMod), run this command:
      ./dualboot.sh UPDATE
After installation, the phone will reboot several times. Once finished, it will boot into Android and you will find the dual boot app as “Ubuntu Installer” in the Apps section.
Now follow the instructions below to install Ubuntu from Android.

Installing Ubuntu from Android

Note: 2.7GB of free memory space is required on your device for the Ubuntu installation.
  1. Optionally, on your desktop, and while your device is still connected via USB, issue the following command on the terminal to free up space (say "Yes" if you are asked to grant permissions on the device):
    adb shell "su sh rm -rf /cache/*"
  2. On the device, press the apps button in Android to bring up the list of apps
  3. Browse the apps to find the Ubuntu Installer icon and press it to start the app
  4. When the app launches, press on Choose channel to install and choose a channel to download from (the recommended channel is Trusty)
  5. Once download is completed you need to Grant SU permissions to the application for the install to be successful. Press the Grant button, when prompted.
  6. Press the Reboot to Ubuntu button to boot to Ubuntu.
  7. A standard phone reboot with the hard key will always boot to Android.
Notes:
  • All channels supported by the phablet-flash tool are also supported by the Ubuntu Installer on Android
  • When selecting an Ubuntu channel, the bootstrap checkbox lets you wipe user data from Ubuntu, otherwise it is kept between installations. Since you're installing for the first time now, it won't make a difference
  • When selecting an Ubuntu channel, unticking the latest version checkbox will let you select a particular image number. Otherwise, if checked it will default to the latest image.
  • If during installation the Ubuntu download finished while the phone was locked or when the Ubuntu Installer app was not on the foreground, the installation button will change to Resume install. This will resume installation to the point where SuperUser permissions are requested.

Additional notes

Updating to a new Ubuntu image

Because Dual Boot is a special set-up the standard update method for Ubuntu currently does not work (see Feature Roadmap).
To update Ubuntu to a newer version, On the android Ubuntu dual boot application, select "Uninstall Ubuntu" from the menu options. Next you will be asked if you want to keep the user data from Ubuntu. If you do not select "Delete user data", the next installation of Ubuntu will preserve your contacts, installed applications, pictures, background settings, ...
Once Ubuntu has been uninstalled, follow the same installation step to download a newer version of Ubuntu.

Getting phone calls to work in Ubuntu and Android 4.4

The radio image shipped with Android 4.4 is reused on the Ubuntu side to make phone calls, and it is not yet supported in Ubuntu. Until Ubuntu gains support for the Android 4.4 radio, there is an easy workaround whereby an older radio firmware can be flashed in the modem partition. You can do this either before or after installing dual boot
Follow these steps to downgrade the radio firmware and get Ubuntu calls to work:
  1. Download an Android 4.3 firmware for your device onto your PC. Follow the links on this table >
  2. Open a terminal with Ctrl+Alt+T
  3. Extract the firmware tarball and cd to its directory.
  4. Run the following command to reboot into the bootloader
    adb reboot bootloader
  5. Once in the bootloader, run this command to reflash the radio. Replace $RADIO_FIRMWARE by the name of the file containing the radio firmware for your device (it's easily recognizable, as it starts with radio-$DEVICECODENAME):{{
fastboot flash radio $RADIO_FIRMWARE.img }}}
  1. After flashing, reboot and phone calls should work in Ubuntu:
    fastboot reboot

If something goes wrong

If something goes wrong after the dual boot installation and you cannot boot either into Ubuntu or Android, you can revert the Android installation to the status it was before dual boot by reflashing the original boot and recovery images. Only the recovery partition is actually modified by dual boot, but you can choose to reflash the boot partition just in case.

  1. Download the Android firmware you are running on your device onto your PC.
  2. Open a terminal with Ctrl+Alt+T
  3. Extract the firmware tarball and cd to its directory.
  4. Run the following command to reboot into the bootloader
    adb reboot bootloader
  5. Once in the bootloader, run this command to reflash the boot partition:
    fastboot flash boot boot.img
  6. Without exiting the bootloader, run this command to reflash the recovery partition:
    fastboot flash recovery recovery.img
  7. After flashing, reboot and your phone should start into Android:
        fastboot reboot
Source : Ubuntu Wiki
- - - - -
Taskbar in Windows 8.1
  • Right-click on a blank area your Taskbar in Windows 8.1, and choose Properties in the pop-up menu.
  • Then in the Taskbar and Navigation Properties window click on Navigation tab.
  • Tick mark the Show my desktop background on Start check box.

  • Tick the checkbox
    Put the tick-mark on the area which has been rounded.
    • Then click OK.
    When you are done with the above steps, the results are predictably excellent

    Demo to wallpaper as start screen background
    Now enjoy it 


- - -
TeamViewer


Graphical installation

For installing TeamViewer, we recommend using the graphical installer. The graphical installer can be invoked by (double) clicking the downloaded package.
If this is not the case and, e.g. the Archive Manager opens up, open the context menu instead (right-click on the downloaded package). Depending on your distribution you will get different possibilities to install the package, e.g. “Open with software installation”, “Open with GDebi package installer”, “Open with Ubuntu Software Center”, or “Open with> QApt package installer”.

RedHat, CentOS, Fedora, SUSE

You need the teamviewer_linux.rpm package.
For installing TeamViewer, we recommend using the graphical installer.
If you prefer to use the command line or if there is no graphical installer available you can use either one of these commands:
  • yum install teamviewer_linux.rpm (recommended, as it will install missing dependencies)
  • rpm -i teamviewer_linux.rpm
In case “yum” is asking for a missing public key, you can download it here and import the key by using following command:
  • rpm --import TeamViewer_Linux_PubKey.asc
After importing the public key, please execute the “yum”-command again to install the TeamViewer rpm.

Debian, Mint, Ubuntu, Kubuntu, Xubuntu…


For 32-bit DEB-systems you need the teamviewer_linux.deb package.
For 64-bit DEB-systems without Multiarch you need the teamviewer_linux_x64.deb package. Please see note on Multiarch below.
For installing TeamViewer, we recommend using the graphical installer.
If you prefer to use the command line or if there is no graphical installer available you can use either one of these commands:
For the 32-bit package:
  • sudo dpkg -i teamviewer_linux.deb
For the 64-bit package:
  • sudo dpkg -i teamviewer_linux_x64.deb
In case “dpkg” indicates missing dependencies, complete the installation by executing the following command:
  • sudo apt-get install -f
Notes to Multiarch: On newer 64-bit DEB-systems with Multiarch-support (Debian 7) teamviewer_linux_x64.deb cannot be installed because the package ia32-libs is not available anymore on these systems. In this case you can use teamviewer_linux.deb instead.
In case you get the error “wrong architecture i386” you have to execute the following command lines:
  • dpkg --add-architecture i386
  • apt-get update
For further information: http://wiki.debian.org/Multiarch/HOWTO

Other platforms

TeamViewer does also run on a lot of other distributions, although not officially supported.
You can use our tar.gz package which will only create files in the directory where you extract it to. The tar.gz package works, if the libraries that TeamViewer depends on are installed which is often the case.
On Mandriva/Mageia TeamViewer can be installed using the following command:
  • urpmi --force --allow-nodeps teamviewer_linux.rpm
On PCLinuxOS TeamViewer can be installed from the repository. The package is provided by the PCLinuxOS team.

Run TeamViewer without installation

The tar.gz package can be run without installation and doesn’t even need root permissions.
After downloading the tar.gz package, you need to extract it to the directory you want to run it from. Simply click on “teamviewer” to start a TeamViewer instance.
The tar.gz package works, if the libraries TeamViewer depends on are installed which is often the case.
You can identify missing libraries by running the command:
- -
The Google Experience Launcher, aka Google Search Launcher, gives you voice search capabilities without having to tap a button. Just say ''Ok, Google'' from any home screen and Google will look it up for you. Google Now can now be found as a home screen as well as via the old swipe up gesture. There's other changes to screen management and settings but you can discover those for yourself. It'll all add to the experience.
First, just download the following three APKs to your device (or PC, in which case you'll need to transfer them to your phone with a USB cable):
PreBuiltGmsCore (Google Play Services 4.0)
Velvet (Google Search)
GoogleHome (Google Launcher)
AndroidPIT Experience Launcher2
Download the three APKs, and install each one. / © AndroidPIT/Google
Once you've downloaded the three components, just install them in turn and you should be all set up with the Google Experience Launcher on your device. If your first experience with the Experience Launcher is a force close of the voice search, don't despair, all you need to do is change your default language for search, do a search and then change your voice search settings straight back to your original language. That's it.
AndroidPIT Experience Launcher3
Google search permissions and the new Settings. / © AndroidPIT/Google
AndroidPIT Experience Launcher4
The Google Experience Launcher tutorial upon first launch. / © AndroidPIT/Google
AndroidPIT Experience Launcher5
A long press brings up new options and Google Now lives on a home screen. / © AndroidPIT/Google
AndroidPIT Experience Launcher6
The new Holo design (left). Don't forget to set Google Search launcher as default. / © AndroidPIT/Google
AndroidPIT Experience Launcher7
If voice search crashes on your first try, just go into settings and Voice. / © AndroidPIT/Google
AndroidPIT Experience Launcher8
Change your language to something else, do a voice search, then change it back to your original language. And that's it, welcome to the Google Experience Launcher with voice search. / © AndroidPIT/Google

[Update: 12:30 PM 01.11.13 Berlin time]

The force close of voice search will need to be dealt with again every time you reboot your phone (via the same method). If this is too much for you and you have root access on your device, you can complete the following fix pulled from XDA Developers to permanently solve the voice search crash issue.
Download the libgoogle_recognizer_ini_I.zip from the XDA link above and extract the ZIP file. Move the ZIP file to /system/lib on your device and the next time you try voice search the force close you get should be the final crash you'll see.
Have you got the Google Experience Launcher on your device already? What other features have you found?
- - -

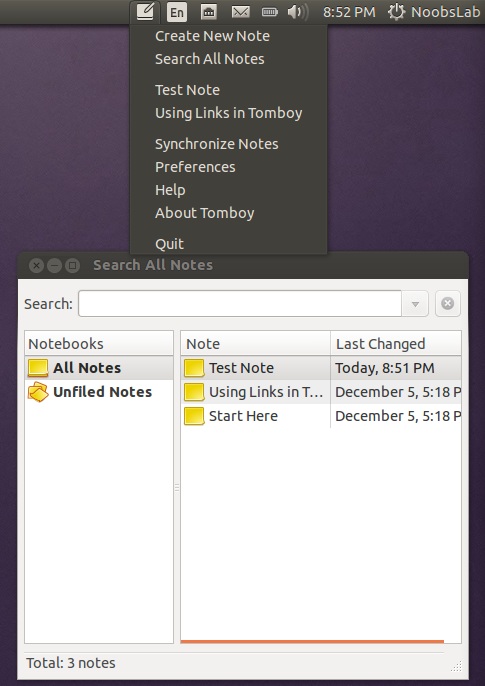
1: Tomboy Notes Indicator

Tomboy is a desktop note-taking application which is simple and easy to use. It lets you organise your notes intelligently by allowing you to easily link ideas together with Wiki style interconnects.
Available for Ubuntu 13.10/13.04/12.10/12.04/11.10/11.04/10.04

To install Tomboy Notes indicator in Ubuntu/Linux Mint open Terminal (Press Ctrl+Alt+T) and copy the following commands in the Terminal:


sudo apt-get install tomboy


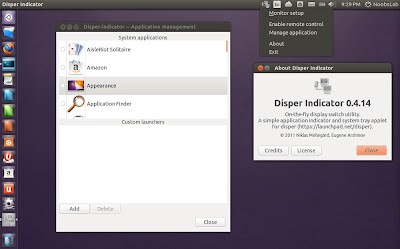
2: Disper Indicator

Disper-indicator is use to switch display. This indicator also detects which monitors are currently in use and shows option to enable single screen, clone or extended screen configurations for NVIDIA cards.
Available for Ubuntu 13.10/13.04/12.10/12.04/11.10

To install Disper indicator in Ubuntu/Linux Mint open Terminal (Press Ctrl+Alt+T) and copy the following commands in the Terminal:


sudo add-apt-repository ppa:noobslab/indicators

sudo apt-get update

sudo apt-get install disper-indicator


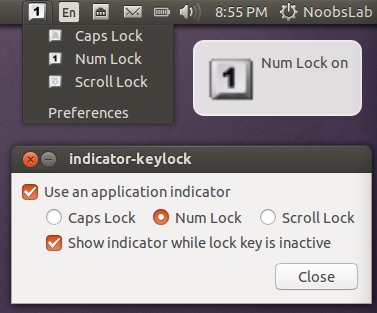
3: Keylock Indicator

Indicator keylock is very useful utility, if your laptop/keyboard doesn't have leds to indicate that Num/Caps/Scroll keys are turned on/off. It shows notification on/off whenever Num/Caps/Scroll keys pressed and it allows indicator to choose icon between Num/Caps/Scroll to show in indicator panel. So with this utility a user can quickly see if Num lock, Caps lock or Scroll lock is turned on/off. After installation start indicator keylock from dash/menu, first time it doesn't show indicator in panel but works perfectly then you need to press any lock key and indicator will popup in panel then go to preferences and select option 'show indicator while lock key is inactive'.
Available for Ubuntu 13.10/13.04/12.10/12.04/11.10/11.04/10.10/10.04

To install Keylock indicator in Ubuntu/Linux Mint open Terminal (Press Ctrl+Alt+T) and copy the following commands in the Terminal:


sudo add-apt-repository ppa:tsbarnes/indicator-keylock
sudo apt-get update

sudo apt-get install indicator-keylock


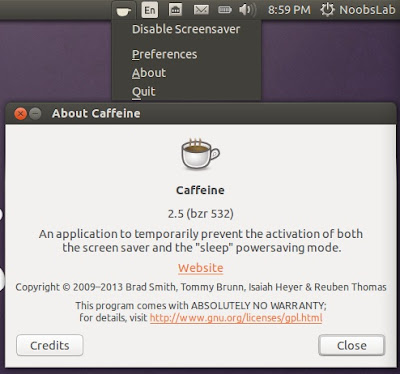
4: Caffeine Indicator

It allows user to temporary disable screensaver/sleep mode, Also there is option to add program in list to disable screensaver permanently for that program.
Available for Ubuntu 13.10/13.04/12.10/12.04/11.10/11.04/10.10/10.04/9.10/9.04

To install Caffeine indicator in Ubuntu/Linux Mint open Terminal (Press Ctrl+Alt+T) and copy the following commands in the Terminal:


sudo add-apt-repository ppa:caffeine-developers/ppa
sudo apt-get update
sudo apt-get install caffeine


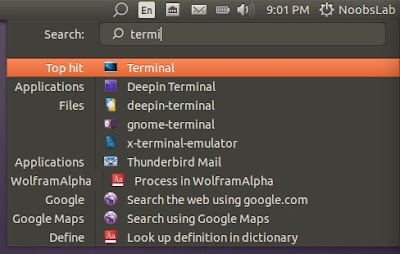
5: Synapse Indicator

Indicator Synapse, a search indicator made by Tom Beckmann for elementary OS. The indicator is similar to Mac OS Spotlight. It creates virtual index of files and items which are on the system. It is designed to access files and items quickly. It also has ability to search in online dictionary/knowledge engine (WolframAlpha) and web.
Available for Ubuntu 13.10/13.04/12.10/12.04

To install Synapse indicator in Ubuntu/Linux Mint open Terminal (Press Ctrl+Alt+T) and copy the following commands in the Terminal:


sudo add-apt-repository ppa:noobslab/apps
sudo apt-get update
sudo apt-get install indicator-synapse


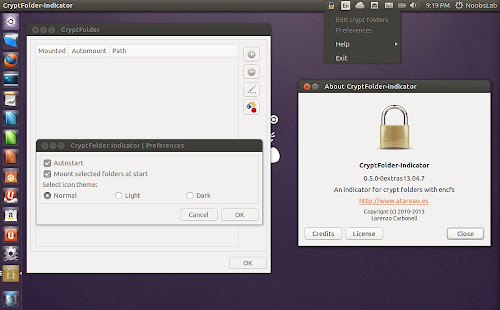
6: Crypt-folder Indicator

With Crypt-Folder you can manage EncFS folders via this indicator, You can mount, unmount EncFS folders, create new EncFS folders, stores the password in Gnome Key-ring and mounts it at login, change existing EncFS folders password.
cryptfolder
Available for Ubuntu 13.10/13.04/12.10/12.04/11.10/11.04/10.10/10.04

To install Cryptfolder indicator in Ubuntu/Linux Mint open Terminal (Press Ctrl+Alt+T) and copy the following commands in the Terminal:


sudo add-apt-repository ppa:atareao/atareao
sudo apt-get update
sudo apt-get install cryptfolder-indicator


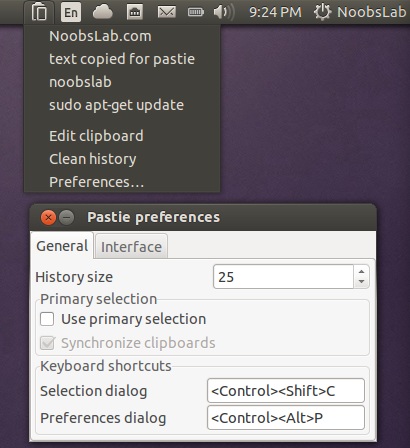
7: Pastie Indicator

Pastie Indicator saves recent copied clipboard data, Which can be easily accessible from Ubuntu panel.
Available for Ubuntu 13.10/13.04/12.10/12.04/11.10/10.10/10.04

To install Pastie indicator in Ubuntu/Linux Mint open Terminal (Press Ctrl+Alt+T) and copy the following commands in the Terminal:


sudo add-apt-repository ppa:noobslab/apps
sudo apt-get update

sudo apt-get install pastie


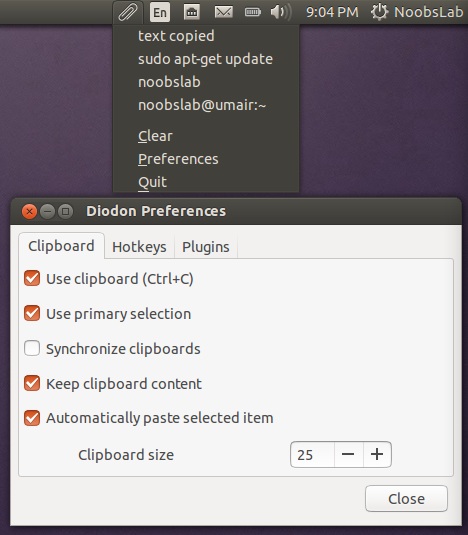
8: Diodon Indicator

Diodon is a lightweight clipboard manager for Linux written in Vala which "aims to be the best integrated clipboard manager for the Gnome/Unity desktop".
Diodon features include Ubuntu indicator, clipboard sync (primary selection and Ctrl+C / Ctrl+V clipboard) and an option to set the clipboard size.

Available for Ubuntu 13.10/13.04/12.10/12.04
(Don't add PPA in 13.10/13.04 because it is available in default Ubuntu repositories)

To install Diodon indicator in Ubuntu/Linux Mint open Terminal (Press Ctrl+Alt+T) and copy the following commands in the Terminal:


sudo add-apt-repository ppa:noobslab/indicators
sudo apt-get update

sudo apt-get install diodon

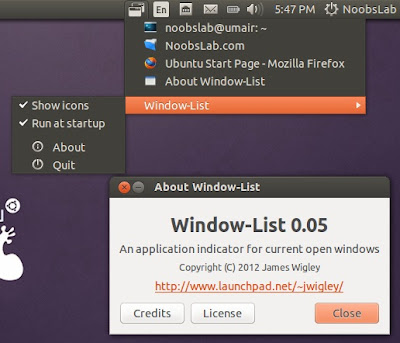
9: Windows-List Indicator

Window-list is an application indicator to display a list of all current open windows via indicator. Each window can be activated by selecting from the list.
Available for Ubuntu 13.10/13.04/12.10/12.04/11.10/11.04

To install Window-List indicator in Ubuntu/Linux Mint open Terminal (Press Ctrl+Alt+T) and copy the following commands in the Terminal:


sudo add-apt-repository ppa:jwigley/window-list
sudo apt-get update

sudo apt-get install window-list


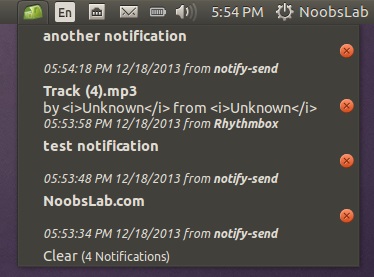
10: Recent Notification Indicator

The Recent Notifications applet displays the recent NotifyOSD notifications and allows you copy the text or a link from a notification. You can also click on a link to open it. There are options to blacklist applications within the applet to hide the associated notifications and set the time limit to show a message.
Available for Ubuntu 13.10/13.04/12.10/12.04/11.10/11.04

To install Recent Notification in Ubuntu/Linux Mint open Terminal (Press Ctrl+Alt+T) and copy the following commands in the Terminal:


sudo add-apt-repository ppa:jconti/recent-notifications
sudo apt-get update

sudo apt-get install indicator-notifications recent-notifications


Logout and Login back to get it work

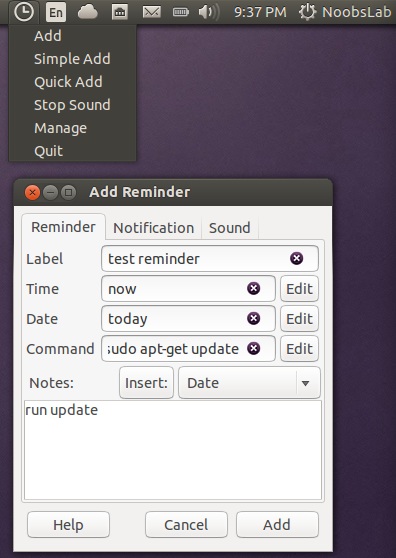
11: Reminder Indicator

Indicator Reminder is an indicator app specially designed for Ubuntu to set schedule reminders. These reminders can be configured to play a sound, show a notification, and/or run a command. Indicator Reminder has a powerful date/time selection feature that allows you to express recurring dates/times in plain English. For example: "every day", "every Monday , "every other", "every weekday", "every 30 minutes", and more!. They can also be set to repeat minutely or hourly.
Available for Ubuntu 13.10/13.04/12.10/12.04

To install Reminder indicator in Ubuntu/Linux Mint open Terminal (Press Ctrl+Alt+T) and copy the following commands in the Terminal:


sudo add-apt-repository ppa:bhdouglass/indicator-remindor
sudo apt-get update
sudo apt-get install indicator-remindor


or install Reminder-qt via this command:


sudo add-apt-repository ppa:bhdouglass/indicator-remindor
sudo apt-get update

sudo apt-get install remindor-qt


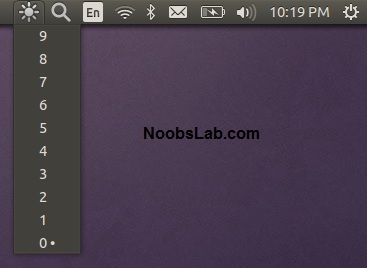
12: Brightness Indicator

If you install Ubuntu/Mint on your laptop then this indicator can be useful for you to control your laptop display brightness with indicator.
Features:
- Clicking the icon shows you all the possible brightness values, to a maximum of 15 steps.
- The current value is indicated with a dot.
- Clicking a menu item sets the brightness to the desired value.
- Scroll wheel event is enabled on the icon. Scrolling up means higher brightness, scrolling down lower.
- Control screen brightness with custom keyboard shortcuts.

Available for Ubuntu 13.10/13.04/12.10/12.04/11.10/11.04

To install Brightness indicator in Ubuntu/Linux Mint open Terminal (Press Ctrl+Alt+T) and copy the following commands in the Terminal:


sudo add-apt-repository ppa:noobslab/indicators
sudo apt-get update
sudo apt-get install indicator-brightness

13: Sensors Indicator

Sensors Indicators display your PC sensors information. In order to use this indicator, your PC must have sensors. Hardware sensors indicator for Unity to display and monitor the readings  from various hardware sensors (temperature, fan speeds, voltages etc).
Available for Ubuntu 13.10/13.04/12.10/12.04/11.10

To install Sensors indicator in Ubuntu/Linux Mint open Terminal (Press Ctrl+Alt+T) and copy the following commands in the Terminal:


sudo add-apt-repository ppa:noobslab/indicators
sudo apt-get update
sudo apt-get install indicator-sensors lm-sensors


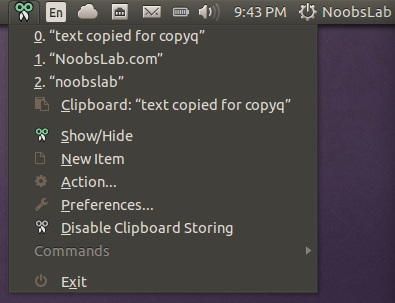
14: Copyq Indicator

CopyQ is advanced clipboard manager with searchable and editable history with support for image formats, command line control and more. Command interface and graphical interface accessible from tray. By default the application stores any new clipboard content in list in the first tab. Main window can be opened by either left clicking on tray icon, running command copyq show or using system-wide shortcut (configurable from Preferences).
Available for Ubuntu 13.10/13.04/12.10/12.04/11.10

To install Copyq in Ubuntu/Linux Mint open Terminal (Press Ctrl+Alt+T) and copy the following commands in the Terminal:


sudo add-apt-repository ppa:samrog131/dump
sudo apt-get update

sudo apt-get install copyq


15: Calendar Indicator

Calendar indicator is linked with Google Calendar, You can access your Google account calendar via this indicator and get notifications directly on your desktop.
Available for Ubuntu 13.10/13.04/12.10/12.04/11.10

To install Calendar indicator in Ubuntu/Linux Mint open Terminal (Press Ctrl+Alt+T) and copy the following commands in the Terminal:


sudo add-apt-repository ppa:atareao/atareao
sudo apt-get update
sudo apt-get install calendar-indicator

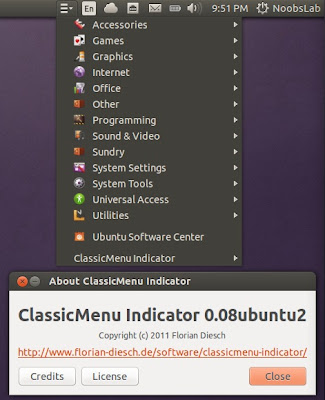
16: Classic Menu Indicator

ClassicMenu Indicator is a notification area applet (application indicator) for the top panel of Ubuntu's Unity desktop environment. It provides a simple way to get a classic GNOME-style application menu for those who prefer this over the Unity dash menu. Like the classic GNOME menu, it includes Wine games and applications if you have those installed.
Available for Ubuntu 13.10/13.04/12.10/12.04/11.10/11.04

To install ClassicMenu-indicator in Ubuntu/Linux Mint open Terminal (Press Ctrl+Alt+T) and copy the following commands in the Terminal:


sudo add-apt-repository ppa:diesch/testing
sudo apt-get update
sudo apt-get install classicmenu-indicator

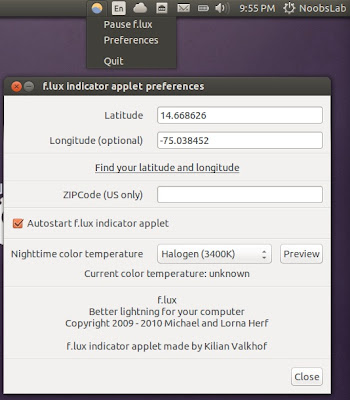
17: FluxGui Indicator

Flux is a small but very useful indicator: It fades your screens to a warmer color temperature in the evening. This is pleasant for your eyes and won’t leave you wide awake at 2am because your computer monitors are so bright.
Available for Ubuntu 13.10/13.04/12.10/12.04/11.10/10.04

To install FluxGui-indicator in Ubuntu/Linux Mint open Terminal (Press Ctrl+Alt+T) and copy the following commands in the Terminal:


sudo add-apt-repository ppa:kilian/f.lux
sudo apt-get update
sudo apt-get install fluxgui

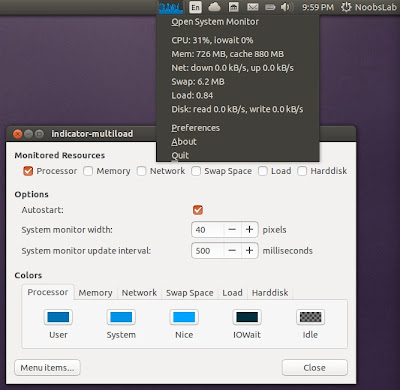
18: Multi-Load Indicator

Multi-Load indicator displays information about your system resources.
Available for Ubuntu 13.10/13.04/12.10/12.04/11.10/11.04

To install MultiLoad-indicator in Ubuntu/Linux Mint open Terminal (Press Ctrl+Alt+T) and copy the following commands in the Terminal:


sudo add-apt-repository ppa:indicator-multiload/stable-daily
sudo apt-get update
sudo apt-get install indicator-multiload

Via : Noobslab
- - - - -