
What to expect after installation
- A single device with the ability to switch between fully functional Android and Ubuntu images
- On Android: an Ubuntu Installer app to install Ubuntu, as well as to boot into Ubuntu
- On Android: the SuperUser app to grant permissions to the Ubuntu Installer app
- On Ubuntu: an Ubuntu Dual Boot app to boot into Android
- Ubuntu system updates are not yet supported from the Ubuntu side, but they can be done via the Android app
Requirements
To install to install dual-boot, you'll need:
- A Nexus 4 device (other Nexus devices should in theory work but have not been tested at the time)
- Android 4.2 or higher running on the device, either stock firmware or based on CyanogenMod or AOSP. Note that Android 4.4 requires additional steps to get phone calls working on the Ubuntu side
- 2.7GB of free storage on the device to install Ubuntu
- ADB tools running on your desktop computer
- The device needs its bootloader to be unlocked and USB debugging enabled. Follow steps 1 to 3 below to do this, or alternatively, if your device is already unlocked and has USB debugging enabled, you can skip to the installation process >
Step 1 - Desktop Setup
The following steps are required on your desktop system that you'll need in order to flash and communicate with the device.
Set up the Touch Developer Preview Tools PPA
The PPA has the tools and dependencies to support Precise, Quantal, Raring and Saucy. Add the Ubuntu Touch PPA by adding the following custom source list entry to your /etc/apt/sources.list file.
On your computer, press Ctrl+Alt+T to start a terminal.
sudo add-apt-repository ppa:phablet-team/tools
Then do the following:
sudo apt-get update
sudo apt-get install phablet-tools android-tools-adb android-tools-fastboot
Step 1.5 - Optional Android Backup
- If not enabled, enable developer mode, by tapping Settings -> About phone -> Build number (x 7 times)
- If not enabled, enable usb debugging in Settings -> Developer options -> USB debugging
- Execute on your computer $ adb backup -apk -shared -all
This should hopefully create backup.ab with all of your apps, OS, and data. Later, after reflashing with android (or rooting / unlocking) you will be able to use $ adb restore backup.ab to restore all of your data.
Step 2 - Device unlock
If the device is already unlocked, skip to Step 3. These steps will wipe all personal data from the device.
- With the device powered off, power on the device by holding the Power button + volume up + volume down.
- The device will boot into the bootloader.
- Plug the device into the computer via the USB cable.
- On your computer, press Ctrl+Alt+T to start a terminal. Type sudo fastboot oem unlock, followed by Enter
- On the device screen, accept the terms of unlocking.
- Boot the device by pressing the power button (pointed by an arrow with Start on the screen).
Device factory reset
If you get stuck in a bootloop rebooting the tablet after unlocking the bootloader... Here's what you do:
- During the bootloop.. hold the power button + volume up + volume down button simultaneously to get yourself back into fastboot mode as you were previously.
- In fastboot mode.. use the volume keys to scroll to Recovery and the power button to select it.
- In Recovery (Android robot on his back with a red triangle)... tap the volume up button and the power button simultaneously which will bring you into stock recovery. Again.. Don't hold the buttons, just tap them simultaneously. Also make sure you're holding the correct volume button. Up will be the volume key on the right.
- Once you're in Recovery.. perform a factory reset/data wipe and then reboot your tablet... you should now be back to the Welcome Screen.
Step 3 - Initial Device Setup
Follow these initial steps on your device:
- If not booted, boot the device into Android
- Enable USB debugging on the device
- on Ice Cream Sandwich (version 4.0) go to Settings and turn on USB Debugging (Settings > System > Developer options > USB debugging).
- on Jelly Bean (versions 4.1 and 4.2) you need to enter Settings, About [Phone|Tablet] and tap the Build number 7 times to see the Developer Options.
- on 4.2.2, (settings > about > tap on build number 7 times to activate the developer options menu item).
- On either Android version you must then enable USB debugging via Settings > Developer options > USB debugging. You will also need to accept a host key on the device.
- On the workstation-> adb kill-server; adb start-server
- Plug the device into the computer via the USB cable.
- Depending on the installed Android version, a popup will show up on the device with the host key that needs to be accepted for the device to communicate with the workstation.
- Note, 'adb devices' should not show the device as 'offline'. If it does, unplug the device, run adb under sudo on the workstation (sudo adb kill-server; sudo adb start-server), then plug the device back in.
- In some cases, the device will continue to show offline, and the host key popup will not appear if the USB connection method is 'MTP' (default for some devices and versions of Android). Unchecking all options in the USB connection method (Settings -> Storage -> Menu -> USB computer connection -> MTP, PTP) seems to resolve this adb connection issue for some users.
- Save the version of the current image on the device, if on Android, to use as a reference to revert back to. The version can be found by going to Settings > About Phone > Build Number.
Newer Nexus 10s have not booted fully after developer mode was enabled. If this occurs boot into the bootloader and do "fastboot -w", then proceed to the next step.
Dual boot installation instructions
Installing the Ubuntu Installer app in Android
- On your computer, download the dual boot installation script into your home directory from: http://humpolec.ubuntu.com/latest/dualboot.sh
- Open a terminal on your computer pressing the Ctrl+Alt+T key combination
- Make the installation script executable by running this command:
chmod +x dualboot.sh - Ensure that your device:
- has booted normally into the Android user interface
- has USB debugging enabled
- has an unlocked bootloader
- Connect your device via USB to your computer
- Install dual-boot by running one of these commands on a terminal:
- If it's the first-time dual-boot installation and you are using stock Android or AOSP firmware without the SuperUser app, run this command:
./dualboot.sh FULL - Alternatively, to update only the Ubuntu Installer Application or if you are running non-stock Android firmware (e.g. CyanogenMod), run this command:
./dualboot.sh UPDATE
After installation, the phone will reboot several times. Once finished, it will boot into Android and you will find the dual boot app as “Ubuntu Installer” in the Apps section.
Now follow the instructions below to install Ubuntu from Android.
Installing Ubuntu from Android
Note: 2.7GB of free memory space is required on your device for the Ubuntu installation.
- Optionally, on your desktop, and while your device is still connected via USB, issue the following command on the terminal to free up space (say "Yes" if you are asked to grant permissions on the device):
adb shell "su sh rm -rf /cache/*" - On the device, press the apps button in Android to bring up the list of apps
- Browse the apps to find the Ubuntu Installer icon and press it to start the app
- When the app launches, press on Choose channel to install and choose a channel to download from (the recommended channel is Trusty)
- Once download is completed you need to Grant SU permissions to the application for the install to be successful. Press the Grant button, when prompted.
- Press the Reboot to Ubuntu button to boot to Ubuntu.
- A standard phone reboot with the hard key will always boot to Android.
Notes:
- All channels supported by the phablet-flash tool are also supported by the Ubuntu Installer on Android
- When selecting an Ubuntu channel, the bootstrap checkbox lets you wipe user data from Ubuntu, otherwise it is kept between installations. Since you're installing for the first time now, it won't make a difference
- When selecting an Ubuntu channel, unticking the latest version checkbox will let you select a particular image number. Otherwise, if checked it will default to the latest image.
- If during installation the Ubuntu download finished while the phone was locked or when the Ubuntu Installer app was not on the foreground, the installation button will change to Resume install. This will resume installation to the point where SuperUser permissions are requested.
Additional notes
Updating to a new Ubuntu image
Because Dual Boot is a special set-up the standard update method for Ubuntu currently does not work (see Feature Roadmap).
To update Ubuntu to a newer version, On the android Ubuntu dual boot application, select "Uninstall Ubuntu" from the menu options. Next you will be asked if you want to keep the user data from Ubuntu. If you do not select "Delete user data", the next installation of Ubuntu will preserve your contacts, installed applications, pictures, background settings, ...
Once Ubuntu has been uninstalled, follow the same installation step to download a newer version of Ubuntu.
Getting phone calls to work in Ubuntu and Android 4.4
The radio image shipped with Android 4.4 is reused on the Ubuntu side to make phone calls, and it is not yet supported in Ubuntu. Until Ubuntu gains support for the Android 4.4 radio, there is an easy workaround whereby an older radio firmware can be flashed in the modem partition. You can do this either before or after installing dual boot
Follow these steps to downgrade the radio firmware and get Ubuntu calls to work:
- Download an Android 4.3 firmware for your device onto your PC. Follow the links on this table >
- Open a terminal with Ctrl+Alt+T
- Extract the firmware tarball and cd to its directory.
- Run the following command to reboot into the bootloader
adb reboot bootloader - Once in the bootloader, run this command to reflash the radio. Replace $RADIO_FIRMWARE by the name of the file containing the radio firmware for your device (it's easily recognizable, as it starts with radio-$DEVICECODENAME):{{
fastboot flash radio $RADIO_FIRMWARE.img }}}
- After flashing, reboot and phone calls should work in Ubuntu:
fastboot reboot
If something goes wrong
If something goes wrong after the dual boot installation and you cannot boot either into Ubuntu or Android, you can revert the Android installation to the status it was before dual boot by reflashing the original boot and recovery images. Only the recovery partition is actually modified by dual boot, but you can choose to reflash the boot partition just in case.
- Download the Android firmware you are running on your device onto your PC.
- Open a terminal with Ctrl+Alt+T
- Extract the firmware tarball and cd to its directory.
- Run the following command to reboot into the bootloader
adb reboot bootloader - Once in the bootloader, run this command to reflash the boot partition:
fastboot flash boot boot.img - Without exiting the bootloader, run this command to reflash the recovery partition:
fastboot flash recovery recovery.img - After flashing, reboot and your phone should start into Android:
fastboot reboot
Source : Ubuntu Wiki

Apple has a couple of brand new patent applications (via AppleInsider) out this morning that are quite different but that both offer a window into potential improvements being worked on in R&D. One deals with a method for introducing better, more accurate color rendering to digital displays, and the other involves improving its current Maps offering with layered on data culled from the Internet.
The display patent application involves “quantum dot-enhanced displays,” which uses components that can be smaller even than biological viruses to fine-tune emitted light. These quant dots are capable of emitting a very narrow spectrum of light, and that would allow for greater control over color accuracy and distribution.
QD displays have a couple other advantages over existing tech including LCD, LED and OLED, including an environmental edge. QDs use size instead of chemicals to alter color, which is more environmentally friendly, and it’s actually cheaper to manufacture and easier to scale than traditional display tech. Displays seem to continually be a limiting factor when it comes to Apple’s ability to meet initial demand on its products, so that could be a big selling point.
As for the Maps application, it suggests a means by which users could layer on different data stats to a basic map view. Google already does this sort of thing with its own maps product, especially on the web, but it’d be interesting to see Apple add more contextual options to its mobile offering. The other big difference here is that in Apple’s patent, search would change according to which layer is being displayed at any given time.
Possible rich data categories that act as layers could include weather, nature, sightseeing, traffic, commerce and historical housing data, according to the patent filing, and searching with any one of these layers active would provide different results. So searching for “Food” when you have the travel layer active would bring up restaurants, but doing the same when you’ve got the commerce layer up would yield grocery store results, for instance.
Apple’s mapping initiative will almost certainly lag Google’s for the foreseeable future in some regards, but adding this kind of flexible rich data approach would make it a lot more contextually useful. The only problem is that it also introduces complexity, which Apple is not prone to do when at all possible.
Both of these patents at least offer a look at strategic paths that Apple could take in terms of delivering the next generation of its products. I’d peg the QD display one as having more potential for near-term benefits, as some display manufacturers are already gearing up to offer that tech at production scale
Source : TechCrunch
Shazam has updated its iPhone
app to tag songs, TV shows and more all on its own, no longer
requiring users to open the app and tap a button whenever they want to
tag something.
The feature, called Auto
Shazam, comes turned off by default, but users can turn it on by
switching a toggle once they've downloaded the latest update for the
app. Once turned on, Auto Shazam will remain on in the phone background
and listen for audio that it can tag while users go about their day
doing other things.
Any time the app tags a song or show with Auto Shazam, it will send users a notification with the name of the audio that it has tagged.
“Shazam is already known as fast and easy, but we want to become effortless,” Shazam Chief Product Officer Daniel Danker told The Times. “The only thing easier than pressing a button is not having to press one at all.”
Auto Shazam is set to turn off after users don't interact with the
app for two hours. This is built-in by Shazam so that the feature won't
drain users' iPhone battery. Shazam recommends using the feature at bars
and coffee shops where music constantly plays and also while watching
TV.
For those concerned about privacy, Shazam assures users that they have nothing to worry about. The app doesn't record audio, it creates digital fingerprints that are sent back to Shazam's servers and matched with fingerprints that are stored there. Those digital fingerprints cannot be converted back into audio, so even though the Shazam iPhone app is always listening and tagging, it is never recording.
Those digital fingerprints also ensure that the app won't run up users' data use. Rather than matching large recorded audio files, which would take up multiple megabytes of data, Shazam's digital fingerprints use less data than the size of an average email, the company said.
Auto Shazam has been available for the iPad for several months now, but this is the first time the company brings the feature to a smartphone. Shazam said it would like to bring the feature to Android, but the company said the Google mobile platform has limitations when it comes to the microphone.
Read more : http://www.latimes.com/business/technology/la-fi-tn-shazam-iphone-autoshazam-20131220,0,4616275.story#ixzz2o6dkMSrC
Any time the app tags a song or show with Auto Shazam, it will send users a notification with the name of the audio that it has tagged.
“Shazam is already known as fast and easy, but we want to become effortless,” Shazam Chief Product Officer Daniel Danker told The Times. “The only thing easier than pressing a button is not having to press one at all.”
 |
| Shazam |
For those concerned about privacy, Shazam assures users that they have nothing to worry about. The app doesn't record audio, it creates digital fingerprints that are sent back to Shazam's servers and matched with fingerprints that are stored there. Those digital fingerprints cannot be converted back into audio, so even though the Shazam iPhone app is always listening and tagging, it is never recording.
Those digital fingerprints also ensure that the app won't run up users' data use. Rather than matching large recorded audio files, which would take up multiple megabytes of data, Shazam's digital fingerprints use less data than the size of an average email, the company said.
Auto Shazam has been available for the iPad for several months now, but this is the first time the company brings the feature to a smartphone. Shazam said it would like to bring the feature to Android, but the company said the Google mobile platform has limitations when it comes to the microphone.
Read more : http://www.latimes.com/business/technology/la-fi-tn-shazam-iphone-autoshazam-20131220,0,4616275.story#ixzz2o6dkMSrC
 |
| NSA |
Documents leaked by former NSA contractor Edward Snowden show that the NSA created and promulgated a flawed formula for generating random numbers to create a "back door" in encryption products, the New York Times reported in September. Reuters later reported that RSA became the most important distributor of that formula by rolling it into a software tool called Bsafe that is used to enhance security in personal computers and many other products.
Undisclosed until now was that RSA received $10 million in a deal that set the NSA formula as the preferred, or default, method for number generation in the BSafe software, according to two sources familiar with the contract. Although that sum might seem paltry, it represented more than a third of the revenue that the relevant division at RSA had taken in during the entire previous year, securities filings show.
The earlier disclosures of RSA's entanglement with the NSA already had shocked some in the close-knit world of computer security experts. The company had a long history of championing privacy and security, and it played a leading role in blocking a 1990s effort by the NSA to require a special chip to enable spying on a wide range of computer and communications products.
RSA, now a subsidiary of computer storage giant EMC Corp, urged customers to stop using the NSA formula after the Snowden disclosures revealed its weakness.
RSA and EMC declined to answer questions for this story, but RSA said in a statement: "RSA always acts in the best interest of its customers and under no circumstances does RSA design or enable any back doors in our products. Decisions about the features and functionality of RSA products are our own."
The NSA declined to comment.
The RSA deal shows one way the NSA carried out what Snowden's documents describe as a key strategy for enhancing surveillance the systematic erosion of security tools. NSA documents released in recent months called for using "commercial relationships" to advance that goal, but did not name any security companies as collaborators.
Via : NDTV Gadgets

1: Tomboy Notes Indicator
Tomboy is a desktop note-taking application which is simple and easy to use. It lets you organise your notes intelligently by allowing you to easily link ideas together with Wiki style interconnects.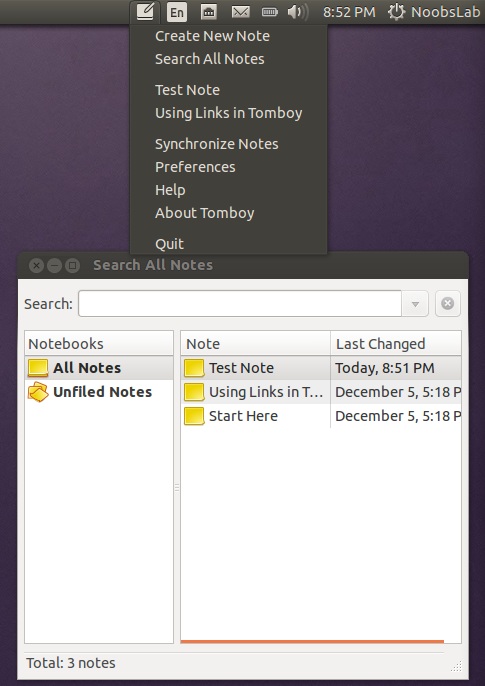
To install Tomboy Notes indicator in Ubuntu/Linux Mint open Terminal (Press Ctrl+Alt+T) and copy the following commands in the Terminal:
sudo apt-get install tomboy
2: Disper Indicator
Disper-indicator is use to switch display. This indicator also detects which monitors are currently in use and shows option to enable single screen, clone or extended screen configurations for NVIDIA cards.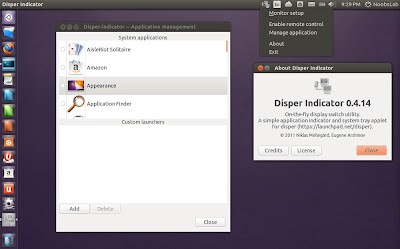
To install Disper indicator in Ubuntu/Linux Mint open Terminal (Press Ctrl+Alt+T) and copy the following commands in the Terminal:
sudo add-apt-repository ppa:noobslab/indicators
sudo apt-get update
sudo apt-get install disper-indicator
3: Keylock Indicator
Indicator keylock is very useful utility, if your laptop/keyboard doesn't have leds to indicate that Num/Caps/Scroll keys are turned on/off. It shows notification on/off whenever Num/Caps/Scroll keys pressed and it allows indicator to choose icon between Num/Caps/Scroll to show in indicator panel. So with this utility a user can quickly see if Num lock, Caps lock or Scroll lock is turned on/off. After installation start indicator keylock from dash/menu, first time it doesn't show indicator in panel but works perfectly then you need to press any lock key and indicator will popup in panel then go to preferences and select option 'show indicator while lock key is inactive'.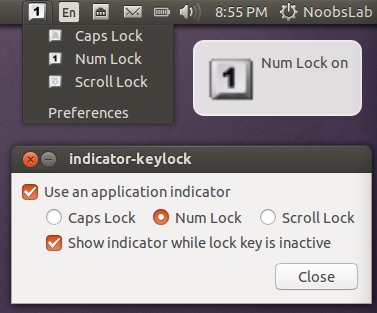
To install Keylock indicator in Ubuntu/Linux Mint open Terminal (Press Ctrl+Alt+T) and copy the following commands in the Terminal:
sudo add-apt-repository ppa:tsbarnes/indicator-keylock
sudo apt-get update
sudo apt-get install indicator-keylock
4: Caffeine Indicator
It allows user to temporary disable screensaver/sleep mode, Also there is option to add program in list to disable screensaver permanently for that program.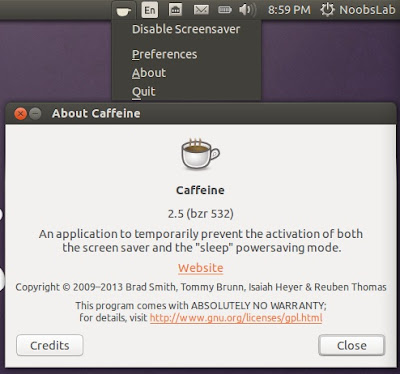
To install Caffeine indicator in Ubuntu/Linux Mint open Terminal (Press Ctrl+Alt+T) and copy the following commands in the Terminal:
sudo add-apt-repository ppa:caffeine-developers/ppa
sudo apt-get update
sudo apt-get install caffeine
5: Synapse Indicator
Indicator Synapse, a search indicator made by Tom Beckmann for elementary OS. The indicator is similar to Mac OS Spotlight. It creates virtual index of files and items which are on the system. It is designed to access files and items quickly. It also has ability to search in online dictionary/knowledge engine (WolframAlpha) and web.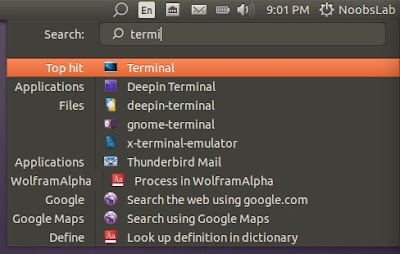
To install Synapse indicator in Ubuntu/Linux Mint open Terminal (Press Ctrl+Alt+T) and copy the following commands in the Terminal:
sudo add-apt-repository ppa:noobslab/apps
sudo apt-get update
sudo apt-get install indicator-synapse
6: Crypt-folder Indicator
With Crypt-Folder you can manage EncFS folders via this indicator, You can mount, unmount EncFS folders, create new EncFS folders, stores the password in Gnome Key-ring and mounts it at login, change existing EncFS folders password.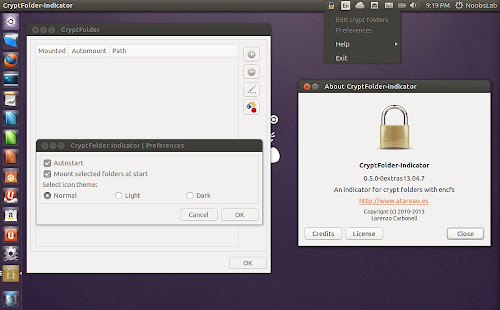
To install Cryptfolder indicator in Ubuntu/Linux Mint open Terminal (Press Ctrl+Alt+T) and copy the following commands in the Terminal:
sudo add-apt-repository ppa:atareao/atareao
sudo apt-get update
sudo apt-get install cryptfolder-indicator
7: Pastie Indicator
Pastie Indicator saves recent copied clipboard data, Which can be easily accessible from Ubuntu panel.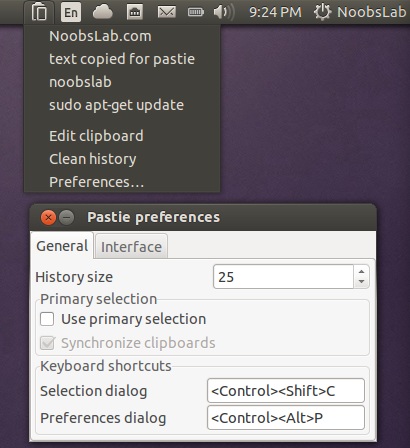
To install Pastie indicator in Ubuntu/Linux Mint open Terminal (Press Ctrl+Alt+T) and copy the following commands in the Terminal:
sudo add-apt-repository ppa:noobslab/apps
sudo apt-get update
sudo apt-get install pastie
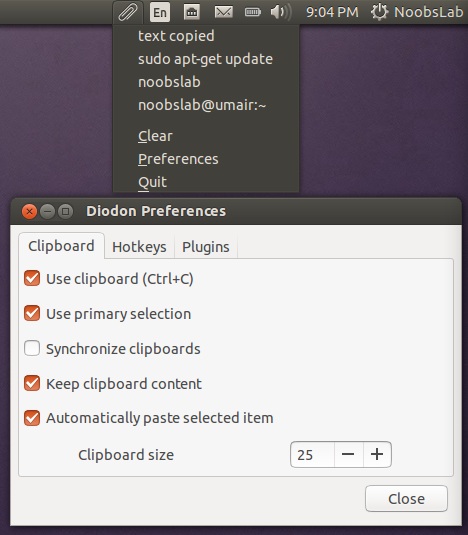
8: Diodon Indicator
Diodon is a lightweight clipboard manager for Linux written in Vala which "aims to be the best integrated clipboard manager for the Gnome/Unity desktop".Diodon features include Ubuntu indicator, clipboard sync (primary selection and Ctrl+C / Ctrl+V clipboard) and an option to set the clipboard size.
(Don't add PPA in 13.10/13.04 because it is available in default Ubuntu repositories)
To install Diodon indicator in Ubuntu/Linux Mint open Terminal (Press Ctrl+Alt+T) and copy the following commands in the Terminal:
sudo add-apt-repository ppa:noobslab/indicators
sudo apt-get update
sudo apt-get install diodon
9: Windows-List Indicator
Window-list is an application indicator to display a list of all current open windows via indicator. Each window can be activated by selecting from the list.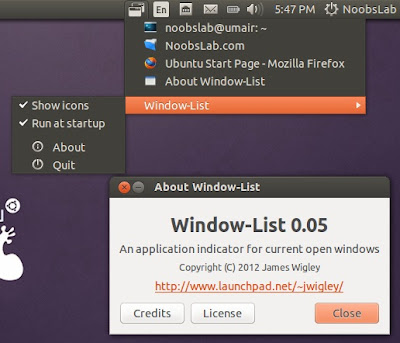
To install Window-List indicator in Ubuntu/Linux Mint open Terminal (Press Ctrl+Alt+T) and copy the following commands in the Terminal:
sudo add-apt-repository ppa:jwigley/window-list
sudo apt-get update
sudo apt-get install window-list
10: Recent Notification Indicator
The Recent Notifications applet displays the recent NotifyOSD notifications and allows you copy the text or a link from a notification. You can also click on a link to open it. There are options to blacklist applications within the applet to hide the associated notifications and set the time limit to show a message.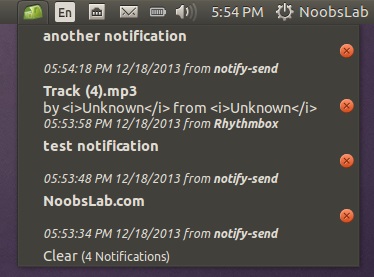
To install Recent Notification in Ubuntu/Linux Mint open Terminal (Press Ctrl+Alt+T) and copy the following commands in the Terminal:
sudo add-apt-repository ppa:jconti/recent-notifications
sudo apt-get update
sudo apt-get install indicator-notifications recent-notifications
Logout and Login back to get it work
11: Reminder Indicator
Indicator Reminder is an indicator app specially designed for Ubuntu to set schedule reminders. These reminders can be configured to play a sound, show a notification, and/or run a command. Indicator Reminder has a powerful date/time selection feature that allows you to express recurring dates/times in plain English. For example: "every day", "every Monday , "every other", "every weekday", "every 30 minutes", and more!. They can also be set to repeat minutely or hourly.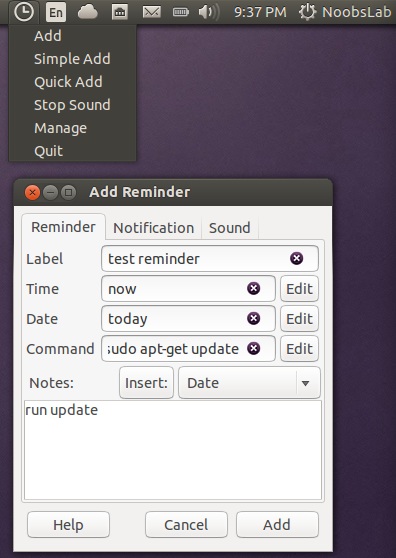
To install Reminder indicator in Ubuntu/Linux Mint open Terminal (Press Ctrl+Alt+T) and copy the following commands in the Terminal:
sudo add-apt-repository ppa:bhdouglass/indicator-remindor
sudo apt-get update
sudo apt-get install indicator-remindor
or install Reminder-qt via this command:
sudo add-apt-repository ppa:bhdouglass/indicator-remindor
sudo apt-get update
sudo apt-get install remindor-qt
12: Brightness Indicator
If you install Ubuntu/Mint on your laptop then this indicator can be useful for you to control your laptop display brightness with indicator.Features:
- Clicking the icon shows you all the possible brightness values, to a maximum of 15 steps.
- The current value is indicated with a dot.
- Clicking a menu item sets the brightness to the desired value.
- Scroll wheel event is enabled on the icon. Scrolling up means higher brightness, scrolling down lower.
- Control screen brightness with custom keyboard shortcuts.
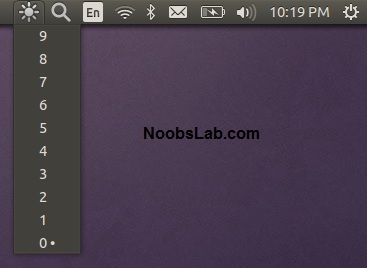
To install Brightness indicator in Ubuntu/Linux Mint open Terminal (Press Ctrl+Alt+T) and copy the following commands in the Terminal:
sudo add-apt-repository ppa:noobslab/indicators
sudo apt-get update
sudo apt-get install indicator-brightness
13: Sensors Indicator
Sensors Indicators display your PC sensors information. In order to use this indicator, your PC must have sensors. Hardware sensors indicator for Unity to display and monitor the readings from various hardware sensors (temperature, fan speeds, voltages etc).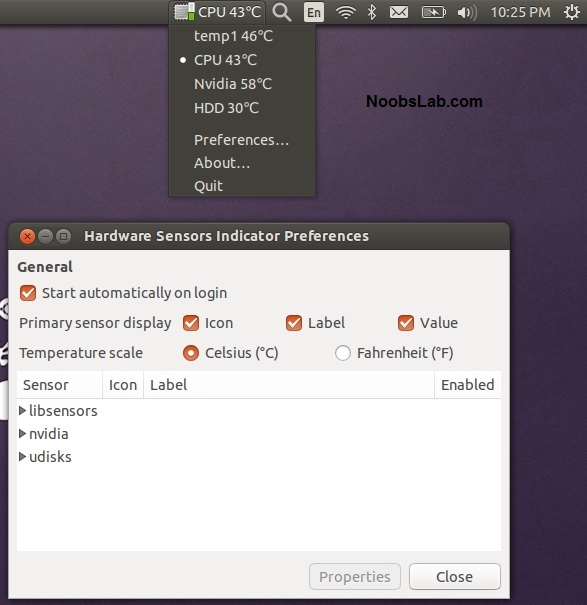
To install Sensors indicator in Ubuntu/Linux Mint open Terminal (Press Ctrl+Alt+T) and copy the following commands in the Terminal:
sudo add-apt-repository ppa:noobslab/indicators
sudo apt-get update
sudo apt-get install indicator-sensors lm-sensors
14: Copyq Indicator
CopyQ is advanced clipboard manager with searchable and editable history with support for image formats, command line control and more. Command interface and graphical interface accessible from tray. By default the application stores any new clipboard content in list in the first tab. Main window can be opened by either left clicking on tray icon, running command copyq show or using system-wide shortcut (configurable from Preferences).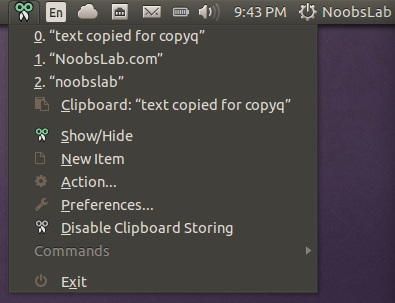
To install Copyq in Ubuntu/Linux Mint open Terminal (Press Ctrl+Alt+T) and copy the following commands in the Terminal:
sudo add-apt-repository ppa:samrog131/dump
sudo apt-get update
sudo apt-get install copyq
15: Calendar Indicator
Calendar indicator is linked with Google Calendar, You can access your Google account calendar via this indicator and get notifications directly on your desktop.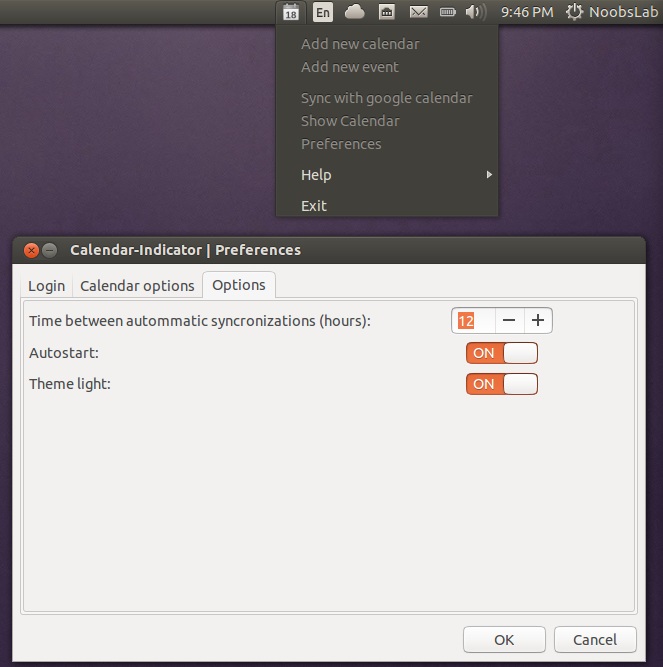
To install Calendar indicator in Ubuntu/Linux Mint open Terminal (Press Ctrl+Alt+T) and copy the following commands in the Terminal:
sudo add-apt-repository ppa:atareao/atareao
sudo apt-get update
sudo apt-get install calendar-indicator
16: Classic Menu Indicator
ClassicMenu Indicator is a notification area applet (application indicator) for the top panel of Ubuntu's Unity desktop environment. It provides a simple way to get a classic GNOME-style application menu for those who prefer this over the Unity dash menu. Like the classic GNOME menu, it includes Wine games and applications if you have those installed.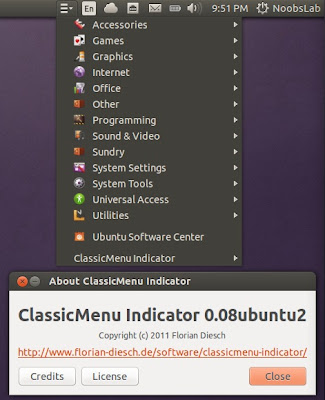
To install ClassicMenu-indicator in Ubuntu/Linux Mint open Terminal (Press Ctrl+Alt+T) and copy the following commands in the Terminal:
sudo add-apt-repository ppa:diesch/testing
sudo apt-get update
sudo apt-get install classicmenu-indicator
17: FluxGui Indicator
Flux is a small but very useful indicator: It fades your screens to a warmer color temperature in the evening. This is pleasant for your eyes and won’t leave you wide awake at 2am because your computer monitors are so bright.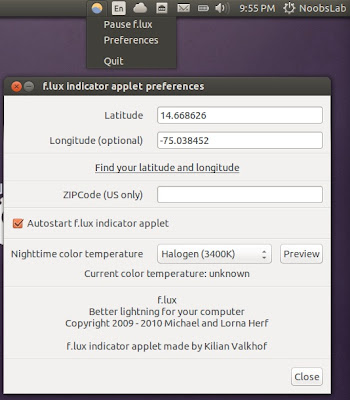
To install FluxGui-indicator in Ubuntu/Linux Mint open Terminal (Press Ctrl+Alt+T) and copy the following commands in the Terminal:
sudo add-apt-repository ppa:kilian/f.lux
sudo apt-get update
sudo apt-get install fluxgui
18: Multi-Load Indicator
Multi-Load indicator displays information about your system resources.
To install MultiLoad-indicator in Ubuntu/Linux Mint open Terminal (Press Ctrl+Alt+T) and copy the following commands in the Terminal:
sudo add-apt-repository ppa:indicator-multiload/stable-daily
sudo apt-get update
sudo apt-get install indicator-multiload
Via : Noobslab
Subscribe to:
Posts (Atom)


Recent Comments