 |
| Ubuntu Touch |
Since the dawn of Android tablets, and really ever since the HTC HD2, developers have been looking for ways to bring Ubuntu to the mobile space. It seems like every new device gets a thread devoted to showing users how to load Ubuntu. More often than not, that implementation requires you to boot Android and then utilize chroot in order to run a Ubuntu instance, but that doesn’t change the fact you’re still running Android.
Don't Miss : iPhone forced Google to start over with Android?
So when news of Ubuntu Touch coming to the Galaxy Nexus, Nexus 4, Nexus 7 and Nexus 10 reached the interwebz, a collective shout of “Yippee!” erupted from the ranks. Then earlier this week Canonical, the creators of Ubuntu, teased us with a video showing Ubuntu Touch in all its glory on a tablet.
On Thursday, Canonical released instructions for installing the Developer Preview on the Nexus devices, and the XDA thread erupted with discussion around it. Then as people began to install the Developer Preview on their devices, one thing became very clear: While a lot of the data being shown in the video looked real, it all exists in the Developer Preview as dummy data. It’s not functional, and is not intended for the user as was displayed. No, this is very clearly an alpha and not intended for the normal user or as a daily-driver. It even is clear that Android is very much part of Ubuntu Touch, even down to a stripped down version of CM10.1 as the base, and chroot is still the process used to run Ubuntu, albeit in a much nicer (and cleaner) boot process.
On Friday they released the porting instructions and another suspicion was confirmed: If your device is in the CM10.1 device tree and can run CM10.1, you too can port Ubuntu Touch to your device relatively easily. And in Friday’s hangout that the Ubuntu Development team hosted they discussed the following key points (props to XDA Senior Member KMyers for not only joining the hangout, but also typing up the results):
Question : Is Ubuntu Touch stable enough for a Daily Driver?
Answer : No, most of the core “Applications” are non-functional . There is also no support for 3G Data
Answer : No, most of the core “Applications” are non-functional . There is also no support for 3G Data
Question : What Devices can Ubuntu Touch Be Ported to?
Answer : As the Ubuntu Touch Preview is simply running in a Cyanogenmod10.1 chroot, theoretically you can port Ubuntu Touch to any device that Cyanogemod 10.1 Supports. Development happened on ICS and eventually moved to JB. Keep in mind that performance may vary. Instructions to port Ubuntu Touch can be found at https://wiki.ubuntu.com/Touch/Porting
Answer : As the Ubuntu Touch Preview is simply running in a Cyanogenmod10.1 chroot, theoretically you can port Ubuntu Touch to any device that Cyanogemod 10.1 Supports. Development happened on ICS and eventually moved to JB. Keep in mind that performance may vary. Instructions to port Ubuntu Touch can be found at https://wiki.ubuntu.com/Touch/Porting
Question : Since this is running in a Cyanogenmod chroot, can it run Native Android Apps?
Answer : No – The Cyanogenmod Fork has been stripped of the Dalvik VM and all other components necessary to run Android Applications. There is a likely possibility that someone will develop a “bluestacks” like emulator to allow android applications to run, but this will most likely not come from the Ubuntu team.
Answer : No – The Cyanogenmod Fork has been stripped of the Dalvik VM and all other components necessary to run Android Applications. There is a likely possibility that someone will develop a “bluestacks” like emulator to allow android applications to run, but this will most likely not come from the Ubuntu team.
Question : Is dual booting possible?
Answer : Yes, thanks to the effort of the people at XDA-Developers, Dual Booting is possible. With this said, this is not something that the Ubuntu Team has any intentions of officially supporting. While Ubuntu seems to encourage community efforts, they stress that they do not want this to become a feature that the end user will expect to see officially supported. (I bet you all wish you got the 32 GB Nexus 7 or Nexus 10 rather then the 16 GB)
Answer : Yes, thanks to the effort of the people at XDA-Developers, Dual Booting is possible. With this said, this is not something that the Ubuntu Team has any intentions of officially supporting. While Ubuntu seems to encourage community efforts, they stress that they do not want this to become a feature that the end user will expect to see officially supported. (I bet you all wish you got the 32 GB Nexus 7 or Nexus 10 rather then the 16 GB)
Question : Is the Ubuntu Touch UI using X11 or Wayland?
Answer : None of the Above. Ubuntu Touch is using the same Display Manager that is in use by Android, Display Flinger.
Answer : None of the Above. Ubuntu Touch is using the same Display Manager that is in use by Android, Display Flinger.
Question : What Kernel is in Use?
Answer : A modified Android Kernel is in use
Answer : A modified Android Kernel is in use
Question : What about CDMA support?
Answer : Fear Not Sprint and Verizon users, it is being worked on. The Ubuntu Team said that the GSM Radio is the global standard and this was simply where they focused most of their attention as all of the developers had GSM devices.
Answer : Fear Not Sprint and Verizon users, it is being worked on. The Ubuntu Team said that the GSM Radio is the global standard and this was simply where they focused most of their attention as all of the developers had GSM devices.
Question : Will Ubuntu be accepting merge requests for the Cyanogen10.1 sub system?
Answer : Yes, this is encouraged.
Answer : Yes, this is encouraged.
Question : Where is the Ubuntu chroot kept in relationship to Android?
Answer : The Ubuntu filesystem and all applications are kept in /data/ubuntu . If you use adb to browse this, you will see a familiar filesystem layout that most Linux users are used to
Answer : The Ubuntu filesystem and all applications are kept in /data/ubuntu . If you use adb to browse this, you will see a familiar filesystem layout that most Linux users are used to
Question : What Works?
Answer : As this is a Developer Build, dont expect much to work. The items that have been confirmed to work are;
Answer : As this is a Developer Build, dont expect much to work. The items that have been confirmed to work are;
- Touchscreen
- Sound (over speakers)
- Display
- Internet Browser
- WiFi (No WPS)
- Camera (Front and Back)
- Video Player
- ADB
- Screen Brightness Controls
- Automatic Brightness
- Speech Driven HUD (Yes, it works)
- GSM Voice (No APN Settings)
- The SideStage Seems to be working
Question : What Does Not Work?
Answer : As this is a developer build, dont expect things to work properly, here are a few things that are not working
Answer : As this is a developer build, dont expect things to work properly, here are a few things that are not working
- 3G/4G Data
- Audio Out via Headphones
- HDMI
- Bluetooth
- Most Applications and Menus
- Charging Indicator
- Software Center (Note : You can install simple shell applications via apt-get install … once inside the chroot)
- Most applications are placeholders
- MMS
- CDMA Connections
- SIM Storage
- Auto Rotation (Or any rotation for that matter)
- Random Crashes when swiping
- Notifications (All of them are placeholders)
- Most Applications that do function are web apps like m.gmail.com.
- NFC
The issue with the release is that the focus in the video was that these features were working and is what would be deployed. What is painfully obvious instead is that the video highlighting those features was just PR and nothing else. Virtually none of the features displayed in the video even work, even on devices like the Nexus lineup that are generally the easiest to develop for, and already fully work on CM10.1. In fact, the calendar app is just a PNG placeholder and does not even function.
This doesn’t mean that we feel that there isn’t a future for this platform, but it does mean that there are definitely opportunities to improve. Here at XDA we publicly reach out and offer our services to the Ubuntu Touch project. We have more experience in the mobile development and mobile telephony space than most outfits, and have a lot to offer in what could be a tremendous collaboration. We look forward to seeing what such a collaboration would produce. // xda-developers
 |
| Ubuntu Touch |
The new feature – a developer preview – will let developers quickly move between Google’s perennial Android mobile OS and Canonical’s fledgling Ubuntu mobile OS. Canonical say that the dual boot mode should work with a number of Android flavours – including stock releases and CyanogenMod – for Android 4.2 Jelly Bean and up.
Don't Miss : Linux Mint 16 "Petra" Xfce and KDE Released
The new feature comes with an app for both platforms that will let you install and reboot into Ubuntu Touch from Android and reboot back into Android from Ubuntu Touch whenever you wish.
So for developers who aren’t willing to or can’t make Ubuntu Touch their daily driver, this new feature puts Canonical’s mobile OS just one click away.

Canonical, of course, caution that this should only be used by developers“comfortable with flashing devices and with their partition layout.” The dual boot feature will overwrite your Android recovery partition, so exercise caution if you’re a developer wanting to give this a shot.
Don't Miss : Download "Linux Command Cheat Sheet", "Other 14 useful eBooks (Included Linux)" and eBooks Collection (Free)
The requirements include:
- A Nexus 4 phone (other Nexus devices may work, but haven’t been tested)
- Android 4.2 or higher with a stock, AOSP, or CyanogenMod-based release
- 2.7GB of free storage on the device
- Android’s adb tools installed on your PC
- Bootloader unlocked
- USB debugging enabled
Once you’ve satisfied the requirements, you can follow the steps provided in the Ubuntu Wiki below for setting up dual boot on your Nexus device. // Ubuntu Developer
 |
| Linux Mint 16 |
Download (SHA256):
Kde 32bit - LinuxMint-16-kde-dvd-32bit.iso (torrent)
Kde 64bit - LinuxMint-16-kde-dvd-64bit.iso (torrent)
Xfce 32bit - LinuxMint-16-xfce-dvd-32bit.iso (torrent)
Xfce 64bit - LinuxMint-16-xfce-dvd-64bit.iso (torrent)
 |
| TeamViewer |
Graphical installation
For installing TeamViewer, we recommend using the graphical installer. The graphical installer can be invoked by (double) clicking the downloaded package.If this is not the case and, e.g. the Archive Manager opens up, open the context menu instead (right-click on the downloaded package). Depending on your distribution you will get different possibilities to install the package, e.g. “Open with software installation”, “Open with GDebi package installer”, “Open with Ubuntu Software Center”, or “Open with> QApt package installer”.
RedHat, CentOS, Fedora, SUSE
You need the teamviewer_linux.rpm package.For installing TeamViewer, we recommend using the graphical installer.
If you prefer to use the command line or if there is no graphical installer available you can use either one of these commands:
yum install teamviewer_linux.rpm(recommended, as it will install missing dependencies)rpm -i teamviewer_linux.rpm
rpm --import TeamViewer_Linux_PubKey.asc
Debian, Mint, Ubuntu, Kubuntu, Xubuntu…
For 32-bit DEB-systems you need the teamviewer_linux.deb package.
For 64-bit DEB-systems without Multiarch you need the teamviewer_linux_x64.deb package. Please see note on Multiarch below.
For installing TeamViewer, we recommend using the graphical installer.
If you prefer to use the command line or if there is no graphical installer available you can use either one of these commands:
For the 32-bit package:
sudo dpkg -i teamviewer_linux.deb
sudo dpkg -i teamviewer_linux_x64.deb
sudo apt-get install -f
Notes to Multiarch:
On newer 64-bit DEB-systems with Multiarch-support (Debian 7) teamviewer_linux_x64.deb cannot be installed because the package ia32-libs is not available anymore on these systems. In this case you can use teamviewer_linux.deb instead.
In case you get the error “wrong architecture i386” you have to execute the following command lines:
In case you get the error “wrong architecture i386” you have to execute the following command lines:
dpkg --add-architecture i386apt-get update
Other platforms
TeamViewer does also run on a lot of other distributions, although not officially supported.You can use our tar.gz package which will only create files in the directory where you extract it to. The tar.gz package works, if the libraries that TeamViewer depends on are installed which is often the case.
On Mandriva/Mageia TeamViewer can be installed using the following command:
urpmi --force --allow-nodeps teamviewer_linux.rpm
Run TeamViewer without installation
The tar.gz package can be run without installation and doesn’t even need root permissions.After downloading the tar.gz package, you need to extract it to the directory you want to run it from. Simply click on “teamviewer” to start a TeamViewer instance.
The tar.gz package works, if the libraries TeamViewer depends on are installed which is often the case.
You can identify missing libraries by running the command:
tv-setup --checklibsVia : Teamviewer.com
1: Collection of free IT eBooks
Browse and free download many other information technology eBooks.

2: Linux Command Cheat Sheet
While most people loathe the command line, it is undoubtedly the most efficient way to get things done. If you are one of those who will freak out when you are on the terminal, we have compiled a list of useful Linux commands that you can use to make your workflow more productive.

3: Linux Patch Management: Keeping Linux Systems Up To Date
Linux® Patch Management offers Linux professionals start-to-finish solutions, strategies, and examples for every environment, from single computers to enterprise-class networks.
Michael Jang presents patching solutions for Red Hat, Fedora, SUSE, Debian, and other distributions. He systematically covers both distribution-specific tools and widely used community tools, such as apt and yum. This book's streamlined patch management techniques minimize impacts on users, networks, and administrators, and address applications as well as the underlying OS. Whatever your role in managing Linux® systems, Linux Patch® Management will reduce your costs, enhance the availability of your systems, and dramatically improve your personal efficiency.
4: Managing Linux® Systems with Webmin™ System Administration and Module Development - Free 808 page eBook
Easy, browser-based Linux/UNIX administration with Webmin--step by step.
Webmin gives you an easy, browser-based solution for virtually any day-to-day Linux/UNIX administration task. Now, there's a definitive Webmin guide for every beginning-to-intermediate sysadmin. Written by Webmin's primary developer, Managing Linux® Systems with Webmin™; delivers authoritative, step-by-step coverage of the latest version of Webmin, from basic installation to centrally managing multiple servers.
5: User Mode Linux®
In this book, you'll find authoritative advice on bootup, compilation, administration, specialized configurations, and much more.
With User Mode Linux®; you can create virtual Linux machines within a Linux computer and use them to safely test and debug applications, network services, and even kernels. You can try out new distributions, experiment with buggy software, and even test security. Now, for the first time, the creator and maintainer of User Mode Linux®; shows how to put it to work hands-on. Jeff Dike covers everything from getting started through running enterprise-class User Mode Linux® servers.
6: Ubuntu: An Absolute Beginners Guide
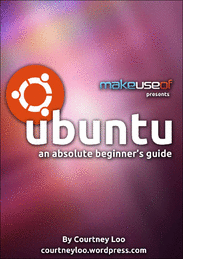
Ubuntu is a free, open-source computer operating system with 20 million users worldwide.
This 30 page guide was written for beginners and will tell you everything you need to know about the Ubuntu experience. You will learn how to install and setup Ubuntu on your computer, find technical support in your community, understand the Ubuntu philosophy, navigate the Unity desktop interface and use Ubuntu compatible software programs.
7: Linux from Scratch

Linux from Scratch describes the process of creating your own Linux system from scratch from an already installed Linux distribution, using nothing but the source code of software that you need.
This 318 page eBook provides readers with the background and instruction to design and build custom Linux systems. This eBook highlights the Linux from Scratch project and the benefits of using this system. Users can dictate all aspects of their system, including directory layout, script setup, and security. The resulting system will be compiled completely from the source code, and the user will be able to specify where, why, and how programs are installed. This eBook allows readers to fully customize Linux systems to their own needs and allows users more control over their system.
8: The GNU/Linux Advanced Administration
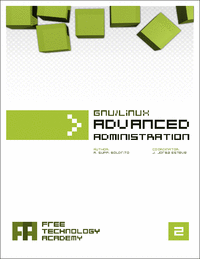
The GNU/Linux systems have reached an important level of maturity, allowing to integrate them in almost any kind of work environment, from a desktop PC to the sever facilities of a big company.
In this ebook "The GNU/Linux Operating System", the main contents are related with system administration. You will learn how to install and configure several computer services, and how to optimize and synchronize the resources using GNU/Linux.
The topics covered in this 500+ page eBook include Linux network, server and data administration, Linux kernel, security, clustering, configuration, tuning, optimization, migration and coexistence with non-Linux systems. A must read for any serious Linux system admin.
Offered Free by: Free Technology Academy (FTA)
9: Self-Service Linux®: Mastering the Art of Problem Determination
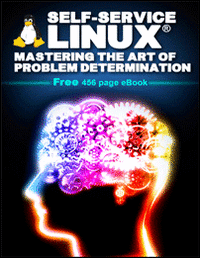
The indispensable start-to-finish troubleshooting guide for every Linux professional.
Now, there's a systematic, practical guide to Linux troubleshooting for every power user, administrator, and developer. In Self-Service Linux®, two of IBM's leading Linux experts introduce a four-step methodology for identifying and resolving every type of Linux-related system or application problem: errors, crashes, hangs, performance slowdowns, unexpected behavior, and unexpected outputs. You'll learn exactly how to use Linux's key troubleshooting tools to solve problems on your own--and how to make effective use of the Linux community's knowledge.
If you use Linux professionally, this book can dramatically increase your efficiency, productivity, and marketability. If you're involved with deploying or managing Linux in the enterprise, it can help you significantly reduce operation costs, enhance availability, and improve ROI.
Series Editor Bruce Perens' is an open source evangelist, developer, and consultant whose software is a major component of most commercial embedded Linux offerings. He founded or cofounded Linux Standard Base, Open Source Initiative, and Software in the Public Interest. As Debian GNU/Linux Project Leader, he was instrumental in getting the system on two U.S. space shuttle flights.
By Mark Wilding, Dan Behman. Published by Prentice Hall. Part of the Bruce Perens' Open Source Series.
Offered Free by: informIT
10: Introduction to Linux - A Hands on Guide

This guide was created as an overview of the Linux Operating System, geared toward new users as an exploration tour and getting started guide, with exercises at the end of each chapter.
For more advanced trainees it can be a desktop reference, and a collection of the base knowledge needed to proceed with system and network administration. This book contains many real life examples derived from the author's experience as a Linux system and network administrator, trainer and consultant. They hope these examples will help you to get a better understanding of the Linux system and that you feel encouraged to try out things on your own.
Offered Free by: Machtelt Garrels
[[ Source ]]

1: Tomboy Notes Indicator
Tomboy is a desktop note-taking application which is simple and easy to use. It lets you organise your notes intelligently by allowing you to easily link ideas together with Wiki style interconnects.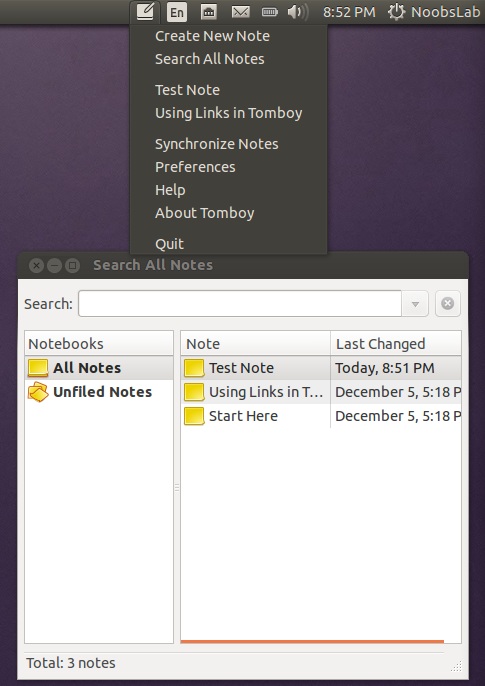
To install Tomboy Notes indicator in Ubuntu/Linux Mint open Terminal (Press Ctrl+Alt+T) and copy the following commands in the Terminal:
sudo apt-get install tomboy
2: Disper Indicator
Disper-indicator is use to switch display. This indicator also detects which monitors are currently in use and shows option to enable single screen, clone or extended screen configurations for NVIDIA cards.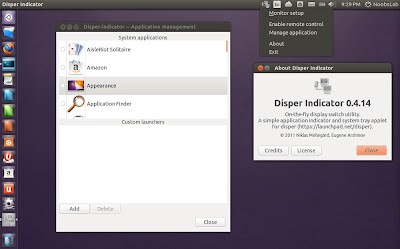
To install Disper indicator in Ubuntu/Linux Mint open Terminal (Press Ctrl+Alt+T) and copy the following commands in the Terminal:
sudo add-apt-repository ppa:noobslab/indicators
sudo apt-get update
sudo apt-get install disper-indicator
3: Keylock Indicator
Indicator keylock is very useful utility, if your laptop/keyboard doesn't have leds to indicate that Num/Caps/Scroll keys are turned on/off. It shows notification on/off whenever Num/Caps/Scroll keys pressed and it allows indicator to choose icon between Num/Caps/Scroll to show in indicator panel. So with this utility a user can quickly see if Num lock, Caps lock or Scroll lock is turned on/off. After installation start indicator keylock from dash/menu, first time it doesn't show indicator in panel but works perfectly then you need to press any lock key and indicator will popup in panel then go to preferences and select option 'show indicator while lock key is inactive'.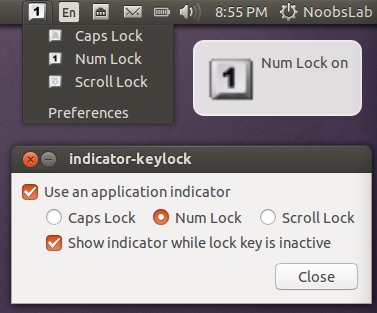
To install Keylock indicator in Ubuntu/Linux Mint open Terminal (Press Ctrl+Alt+T) and copy the following commands in the Terminal:
sudo add-apt-repository ppa:tsbarnes/indicator-keylock
sudo apt-get update
sudo apt-get install indicator-keylock
4: Caffeine Indicator
It allows user to temporary disable screensaver/sleep mode, Also there is option to add program in list to disable screensaver permanently for that program.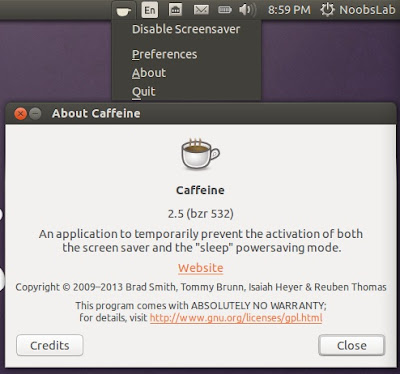
To install Caffeine indicator in Ubuntu/Linux Mint open Terminal (Press Ctrl+Alt+T) and copy the following commands in the Terminal:
sudo add-apt-repository ppa:caffeine-developers/ppa
sudo apt-get update
sudo apt-get install caffeine
5: Synapse Indicator
Indicator Synapse, a search indicator made by Tom Beckmann for elementary OS. The indicator is similar to Mac OS Spotlight. It creates virtual index of files and items which are on the system. It is designed to access files and items quickly. It also has ability to search in online dictionary/knowledge engine (WolframAlpha) and web.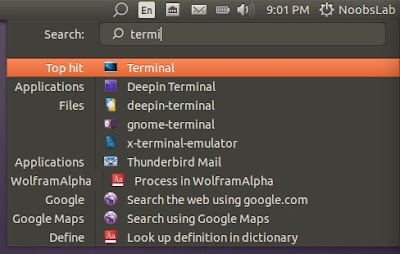
To install Synapse indicator in Ubuntu/Linux Mint open Terminal (Press Ctrl+Alt+T) and copy the following commands in the Terminal:
sudo add-apt-repository ppa:noobslab/apps
sudo apt-get update
sudo apt-get install indicator-synapse
6: Crypt-folder Indicator
With Crypt-Folder you can manage EncFS folders via this indicator, You can mount, unmount EncFS folders, create new EncFS folders, stores the password in Gnome Key-ring and mounts it at login, change existing EncFS folders password.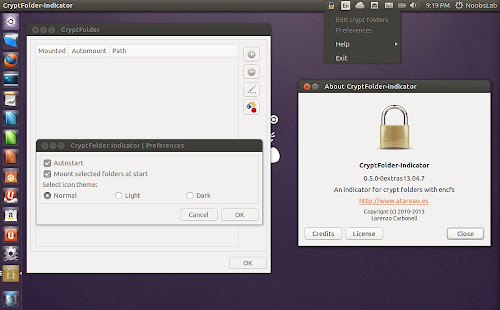
To install Cryptfolder indicator in Ubuntu/Linux Mint open Terminal (Press Ctrl+Alt+T) and copy the following commands in the Terminal:
sudo add-apt-repository ppa:atareao/atareao
sudo apt-get update
sudo apt-get install cryptfolder-indicator
7: Pastie Indicator
Pastie Indicator saves recent copied clipboard data, Which can be easily accessible from Ubuntu panel.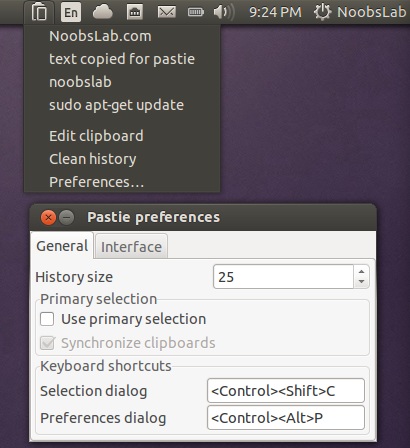
To install Pastie indicator in Ubuntu/Linux Mint open Terminal (Press Ctrl+Alt+T) and copy the following commands in the Terminal:
sudo add-apt-repository ppa:noobslab/apps
sudo apt-get update
sudo apt-get install pastie
8: Diodon Indicator
Diodon is a lightweight clipboard manager for Linux written in Vala which "aims to be the best integrated clipboard manager for the Gnome/Unity desktop".Diodon features include Ubuntu indicator, clipboard sync (primary selection and Ctrl+C / Ctrl+V clipboard) and an option to set the clipboard size.
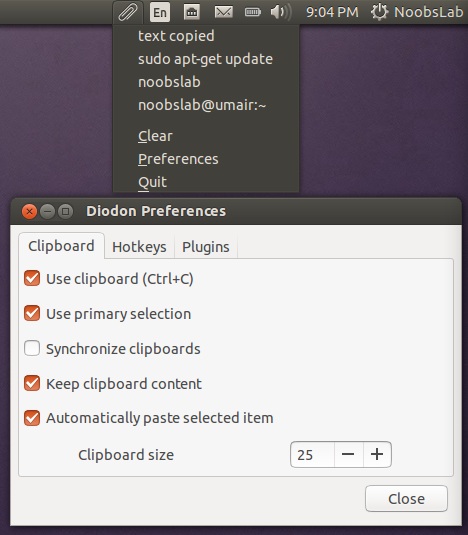
(Don't add PPA in 13.10/13.04 because it is available in default Ubuntu repositories)
To install Diodon indicator in Ubuntu/Linux Mint open Terminal (Press Ctrl+Alt+T) and copy the following commands in the Terminal:
sudo add-apt-repository ppa:noobslab/indicators
sudo apt-get update
sudo apt-get install diodon
9: Windows-List Indicator
Window-list is an application indicator to display a list of all current open windows via indicator. Each window can be activated by selecting from the list.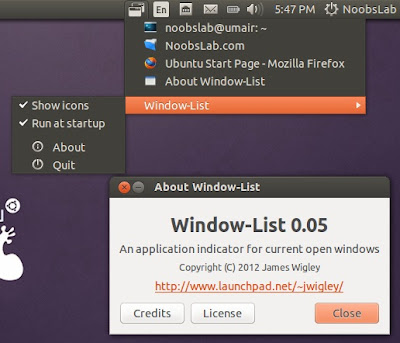
To install Window-List indicator in Ubuntu/Linux Mint open Terminal (Press Ctrl+Alt+T) and copy the following commands in the Terminal:
sudo add-apt-repository ppa:jwigley/window-list
sudo apt-get update
sudo apt-get install window-list
10: Recent Notification Indicator
The Recent Notifications applet displays the recent NotifyOSD notifications and allows you copy the text or a link from a notification. You can also click on a link to open it. There are options to blacklist applications within the applet to hide the associated notifications and set the time limit to show a message.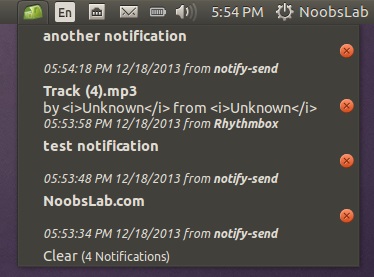
To install Recent Notification in Ubuntu/Linux Mint open Terminal (Press Ctrl+Alt+T) and copy the following commands in the Terminal:
sudo add-apt-repository ppa:jconti/recent-notifications
sudo apt-get update
sudo apt-get install indicator-notifications recent-notifications
Logout and Login back to get it work
11: Reminder Indicator
Indicator Reminder is an indicator app specially designed for Ubuntu to set schedule reminders. These reminders can be configured to play a sound, show a notification, and/or run a command. Indicator Reminder has a powerful date/time selection feature that allows you to express recurring dates/times in plain English. For example: "every day", "every Monday , "every other", "every weekday", "every 30 minutes", and more!. They can also be set to repeat minutely or hourly.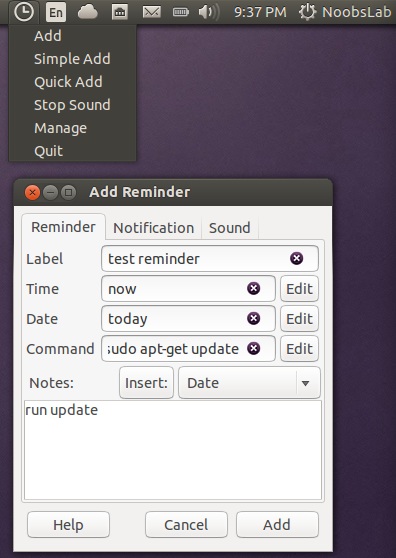
To install Reminder indicator in Ubuntu/Linux Mint open Terminal (Press Ctrl+Alt+T) and copy the following commands in the Terminal:
sudo add-apt-repository ppa:bhdouglass/indicator-remindor
sudo apt-get update
sudo apt-get install indicator-remindor
or install Reminder-qt via this command:
sudo add-apt-repository ppa:bhdouglass/indicator-remindor
sudo apt-get update
sudo apt-get install remindor-qt
12: Brightness Indicator
If you install Ubuntu/Mint on your laptop then this indicator can be useful for you to control your laptop display brightness with indicator.Features:
- Clicking the icon shows you all the possible brightness values, to a maximum of 15 steps.
- The current value is indicated with a dot.
- Clicking a menu item sets the brightness to the desired value.
- Scroll wheel event is enabled on the icon. Scrolling up means higher brightness, scrolling down lower.
- Control screen brightness with custom keyboard shortcuts.
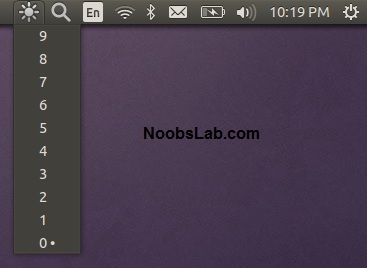
To install Brightness indicator in Ubuntu/Linux Mint open Terminal (Press Ctrl+Alt+T) and copy the following commands in the Terminal:
sudo add-apt-repository ppa:noobslab/indicators
sudo apt-get update
sudo apt-get install indicator-brightness
13: Sensors Indicator
Sensors Indicators display your PC sensors information. In order to use this indicator, your PC must have sensors. Hardware sensors indicator for Unity to display and monitor the readings from various hardware sensors (temperature, fan speeds, voltages etc).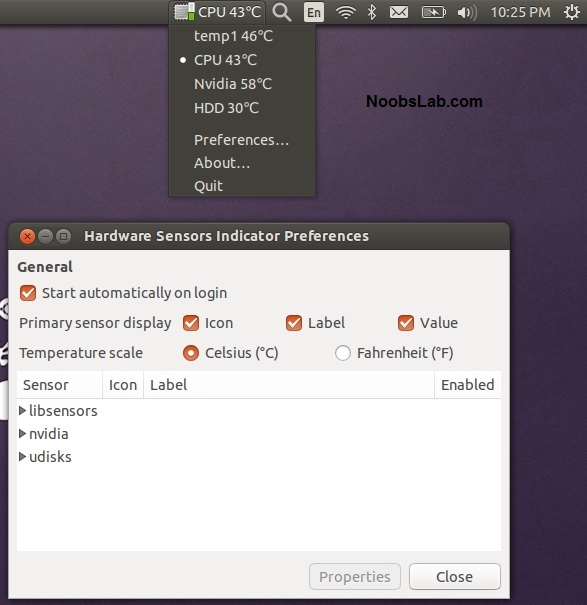
To install Sensors indicator in Ubuntu/Linux Mint open Terminal (Press Ctrl+Alt+T) and copy the following commands in the Terminal:
sudo add-apt-repository ppa:noobslab/indicators
sudo apt-get update
sudo apt-get install indicator-sensors lm-sensors
14: Copyq Indicator
CopyQ is advanced clipboard manager with searchable and editable history with support for image formats, command line control and more. Command interface and graphical interface accessible from tray. By default the application stores any new clipboard content in list in the first tab. Main window can be opened by either left clicking on tray icon, running command copyq show or using system-wide shortcut (configurable from Preferences).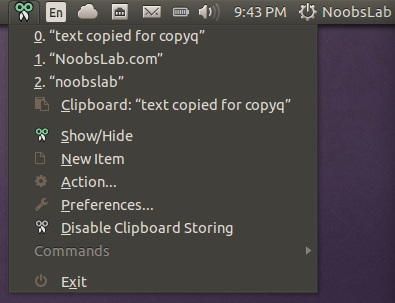
To install Copyq in Ubuntu/Linux Mint open Terminal (Press Ctrl+Alt+T) and copy the following commands in the Terminal:
sudo add-apt-repository ppa:samrog131/dump
sudo apt-get update
sudo apt-get install copyq
15: Calendar Indicator
Calendar indicator is linked with Google Calendar, You can access your Google account calendar via this indicator and get notifications directly on your desktop.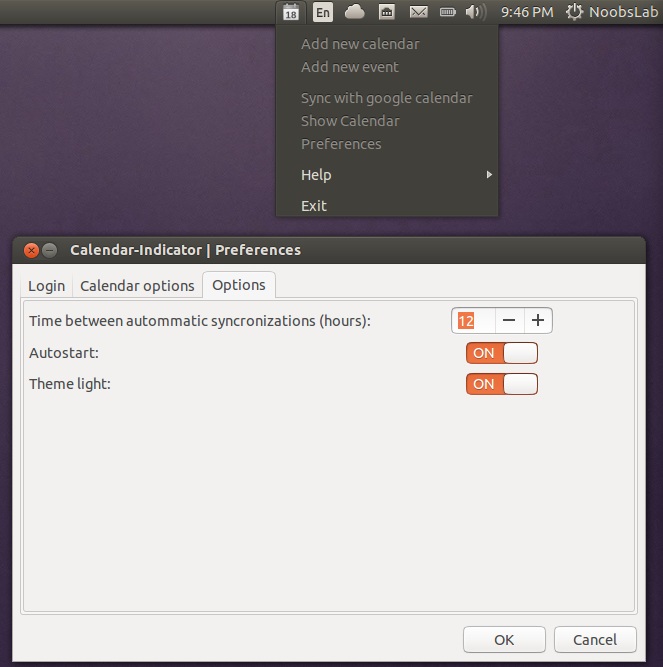
To install Calendar indicator in Ubuntu/Linux Mint open Terminal (Press Ctrl+Alt+T) and copy the following commands in the Terminal:
sudo add-apt-repository ppa:atareao/atareao
sudo apt-get update
sudo apt-get install calendar-indicator
16: Classic Menu Indicator
ClassicMenu Indicator is a notification area applet (application indicator) for the top panel of Ubuntu's Unity desktop environment. It provides a simple way to get a classic GNOME-style application menu for those who prefer this over the Unity dash menu. Like the classic GNOME menu, it includes Wine games and applications if you have those installed.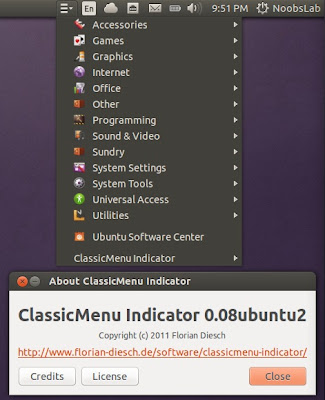
To install ClassicMenu-indicator in Ubuntu/Linux Mint open Terminal (Press Ctrl+Alt+T) and copy the following commands in the Terminal:
sudo add-apt-repository ppa:diesch/testing
sudo apt-get update
sudo apt-get install classicmenu-indicator
17: FluxGui Indicator
Flux is a small but very useful indicator: It fades your screens to a warmer color temperature in the evening. This is pleasant for your eyes and won’t leave you wide awake at 2am because your computer monitors are so bright.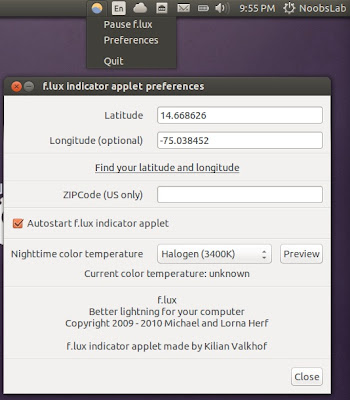
To install FluxGui-indicator in Ubuntu/Linux Mint open Terminal (Press Ctrl+Alt+T) and copy the following commands in the Terminal:
sudo add-apt-repository ppa:kilian/f.lux
sudo apt-get update
sudo apt-get install fluxgui
18: Multi-Load Indicator
Multi-Load indicator displays information about your system resources.
To install MultiLoad-indicator in Ubuntu/Linux Mint open Terminal (Press Ctrl+Alt+T) and copy the following commands in the Terminal:
sudo add-apt-repository ppa:indicator-multiload/stable-daily
sudo apt-get update
sudo apt-get install indicator-multiload
Via : Noobslab
Subscribe to:
Posts (Atom)


Recent Comments